November 12, 2010

Celebrate the Season - Fun and easy things to do with ribbon!

Hey everyone, this is Kimberly and I am so excited that it is, once again, my turn to share another project with you!  Be sure to stop by my My Craft Spot, for more fun projects and vidoes!

I love Christmas and how it turns my thoughts towards things most important in life . . . family, Jesus Christ, serving others and being thankful for all I have.  I love the decorations, the snow, the beautiful music and the yummy foods made only this time of year.

For now, I am trying to get a head start on my stash of Christmas cards and gift tags! 


All of the sentiments on the card and tag are stamps from My Pink Stamper.  The cardstock is a mix from my stash, but mostly Crate Paper. The overall card measures 5 3/4 inches by 5 3/4 inches.  The red paper is a 5 1/2 square.  The green is 5 x 5 inches and the cream square is 4 3/4 x 4 3/4.


 The deer and trees are from Gypsy Wanderings.  I cut the deer at 3.08 inches and the trees at 3.43, 2.92 and 3.55.


Scroll down for videos showing how I made the gathered border and how to crochet the sweet little flower!


I used Cranberry Crinkle Ribbon from My Craft Spot for the ruffled border and for the bow.


I inked everything with Walnut and Tea Dye distress inks.


This tree was cut from Gypsy Wanderings at 3.55.  I cut it twice.  Once in brown and once in green.  Then I trimmed off the bottom of the green so I could layer it on top of the brown.


Scroll down for videos showing how to make the Crinkle Ribbon Flower and the Crocheted flower!


Videos:

Part One:  Gathered Crinkle Ribbon


Part Two:  Crinkle Ribbon Flower


Part Three: Crocheted Flower


Be sure to check out my blog, My Craft Spot , for more cards, projects and videos! I made these fun cards and ornaments using some of my favorite Cricut cartridges and my Hand Dyed Crinkle Ribbon.


Have a great weekend!!

November 11, 2010

Rose Tutorial

Hi! It's Barb (Crafty Girl) and I am back to share a tutorial with you! Thank you Sassy for letting me visit your blog and share my ideas!! I was at a flea market a few weeks ago and I saw these fabulous flowers that someone was selling as a hair accessory. It was darling and I thought to myself... I can do that!! Now, I am not one to come home and research for hours to find the official directions for anything!! I would rather just jump right in there and get to it... and that is what I did!! heehee!!!! Here is a peek at the rose we are going to make today....
Do you like it?! Would you like to see how I made it?! Well... before I start, I am just going to go ahead and apologize for the quality of the photos. I enlisted the help of my teenage son since I was using a glue gun and couldn't take the pictures while making the rose. Some of the pictures were too blurry to use but I think you will get the basic idea......

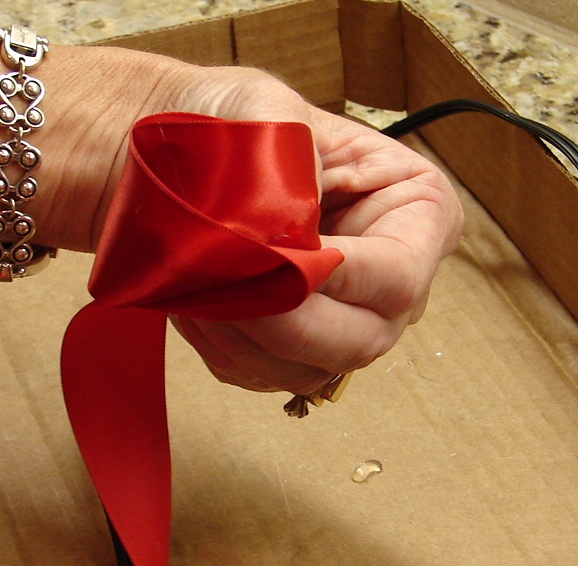
You will need a circle punch, a glue gun and some satin ribbon that does NOT have wire in it! Punch a circle from a coordinating piece of cardstock.


Start by rolling up a small section of the ribbon, then place a small amount of glue in the center of the circle and place the rolled part of the ribbon in the glue.

Continue to put down a small amount of glue using your hot glue gun while wrapping the ribbon around the circle. You will want to wrap this loosely. If you get your layers too tight, you are going to lose the look of the rose. The picture above gives you the general idea of how you should wrap the ribbon.


When I get to the end, I cut off the remaining ribbon and tuck a small piece under the circle. I like to turn the ribbon at this point so that it looks more like the outer layer of a rose in bloom.


Now... this is the fun part!! I used a long lighter and I brought the flame close enough to the ribbon to start to melt it. Be careful though... if you get too close it will burn and could even catch fire!!

If I am using a thick ribbon, like I did on this rose, I also take the flame to the side of the flower so that the sides melt a bit and curl in like a real rose petal would.


I decided to place my rose on a card. The paper is from My Mind's Eye. The chipboard piece was something I had laying around my room along with the ribbon. The leaves for the rose were taken from some silk flowers I had in my stash. the leaves were huge so I cut them down to fit the size of rose I made! The fun little gems on the chipboard were done using my iRock tool!! I love my new toy!! I hope you enjoyed my tutorial today and that this little project gives you one more embellishment that you can make yourself to add to your cards, layouts and other altered art projects!!

November 10, 2010

"Fall" layout using Doodle Charms

Hello everyone!  This is Beatriz from Amazing Grace Blog .Today I am sharing with you the recipe for a class I taught in Ft. Lauderdale, Florida last weekend. I used "Doodle Charms" Cricut Cartridge for the entire page. The circle in the center is by BoBunny.


 Recipe:
1 Basket  size 4". Color Brown. Page #116
2 Apples size 3". Color Red. Page #118
2 Apples size 3 1/2". Color Red. Page #118
3 Apples size 2". Color Red. Page #118
2 Leaves size 2" (shift). Color Green Page #115
1 Leaves size 2". Color Green. Page #115
2 Leaves size 2 1/2" (shift). Color Rust. Page #115
3 Leaves size 2 1/4" (shift). Color Yellow. Page #115
1 Leaves size 2". Color Yellow. Page #115
2 Leaves size 2". Color Brown. Page #115
2 Leaves size 2 1/2". Color Brown. Page #115
1 Pumpkin size 3" (shadow). Color Orange. Page #120
1 Pumpkin size 4" (shadow). Color Orange. Page #120
1 Pumpkin size 3 1/2" (shadow). Color Orange. Page #120
1 Pumpkin size 2 1/2" (shadow). Color Orange. Page #120
2 Flowers  size 2" (shadow). Color Orange. Page #91
2 Flowers  size1" (shadow). Color Orange. Page #91
2 Flowers  size  1 1/2" (shadow). Color Orange. Page #91
2 Flowers  size 2 1/2" (shadow). Color Red. Page #90
2 Flowers  size 1 3/4" (shadow). Color Red. Page #90
3 Flowers  size 3/4" (shadow). Color Red. Page #90
2 Flowers  size 2" (shadow). Color Red. Page #90
2 Flowers  size 2 1/4".(blackout). Color Yellow. Page #90
3 Flowers  size 1 1/2".(blackout). Color Yellow. Page #90
3 Flowers  size 1".(blackout). Color Yellow. Page #91
3 Flowers  size 1 3/4".(blackout). Color Yellow. Page #91
3 Flowers  size 2".(blackout). Color Yellow. Page #91

Emboss with the cuttlebug all flowers. Ink the edges and use pop ups between the layers for more dimension.

Hope you enjoyed this project. Thank you Sheila for this fabulous blog! Have a wonderful and blessed Wednesday!

November 9, 2010

A THANKSGIVING TAG

  Hello to all,
This is me, flowerdisco and I hope you all enjoy my project for Sassy today!

Mid November already,

What can I say but Happy Thanksgiving to you all
There are so much we have to be grateful for, not just on thanksgiving but everyday you are alive and have a roof over your head and bread on your table and no terminal illnesses around.
Yes, everyday I get up and I say
"Thank You God for another day in our lives here on earth",
actually, Lulu and I say it every morning before we get off the bed. I am so blessed I have no words that can explain the joy in me.

Anyhow,

another term here at my dear Sassy Lady has come and since time is getting very valuable for all of us, after Thanksgiving we have Black Friday and then Christmas, I needed a project that would be easy and fast to make.

Let's count together.......

One, Two and Three
and I made a

Thanksgiving Tag
5 inches high
Psss!  don't believe me, it did not take me a second to make, lol.

I will be using this tag for my hostess gift.
The tag I found in the A Child's Year cartridge (first one showing up in my Gypsy, lol) and you will find it too on page #11. I used another tag for the sentiment also from the A Child's Year from page #9 and cut it at 1.35"H and 2.73"W.

I embossed the tag with a cuttlebug folder named Textile and distressed the tag edges.


I used my Cri-Kits to write Happy Thanksgiving inside my smaller tag using Lyrical Letters. I then used my Sharpie markers to fill in the letters and I used my glitter pen for some bling on it.

The cardstock is from Debbie Mumm 2008 Harvest and Holiday collection.
The gorgeous button is a vintage button that belonged to my 80 something years old neighbor who RIP with the lord and I got to inherit a lot of buttons.


I hope you enjoyed your short visit today at Sassy's.

Love you All!

Note:
The "s" in Thanksgiving is my handwriting cause I forgot the s when on the Gypsy. I bet you couldn't tell, lol.

November 8, 2010

Che'ri


Isn't this a lovely layout? I just love when I have a layout that I can use four photos on it. I used French Manor and Summer in Paris for this along with my Cuttlebug to prepare the mats for my photos. The sketch is from Jana Eubank and is simply elegant, don't you think? This layout was made for a lovely lady and I must admit I will probably make another to use with a different title and filled with family photos.
Look at these lovely papers! They are all Cosmo Cricket paper and wow are they nice to cut with.
I had to take a close up of the paper so you could see the sheen in the paper, isn't it awesome? I used it to make the scallops edge and the photo mats on my page. They were cut from the French Manor cart page 56 the scallop border. I welded two together to form this beautiful border edge.
The flowers were made from French Manor. I made them in 5 different sizes and altered print and solid paper to make them appear to have more dimension. I turned the edges up slightly and held each layer together with a large glue dot to add even more dimension. for the center of the flower I used Zip Dry glue as it is clear drying and applied 16 to 20 tiny pearls to form a 1/4 inch center of pearls in each flower. Didn't they turn out awesome?
Here you can see a close up of the photo mats allowing a beautiful embossed edge with help of the Swirl folder and my Cuttle Bug.
I applied 7 pearls to each scallop, and in this photo you can see how nice the flowers look.
Here is another close up. Since I was making this for someone else I took plenty of photos.
Don't you just love the pearls on this layout?
Here is another closeup of the pearls and a flower.
I hope I am not boring you with these closeups but I really like the paper on this and it was so hard to get a good photo of the shimmering effect it has.
Here is a good close up of the light hitting it just right.
Well I sure hope you like today's project. I am kind of sad to see it go. Thank you for joining me today and for your sweet words of encouragement. Your comments continue to inspire me to share with you.
signature

November 7, 2010

School Projects

School projects are so much fun but even more so when 3 of us get together and mix in craft elements a Gypsy and a Cricut.... Now that adds up to a lot of fun!!! Meet my little Sydney, she is in first grade and needed to complete her school project on Spider Webs. Her teacher wanted to give the children an opportunity to feel different textures.
Well here I am after my Sunday nap with Sydney (don't laugh at my funky sleep hair). Every Sunday after church I change into my grubs and take a little nap and I love it after a hard week, you should try it as it is really refreshing. Oops back to the project Sydney was busy writing facts about webs on the poster board.

This is her Mommy, my daughter Jennifer helping.
The project was started with Sydney spraying glitter on the spider web. The big web had a heavy texture to it as it was made of felt and was actually a table runner that we stapled on the poster board. This made the web glisten. The two little black items on the grass are spiders from Doodle Charms.
Then Sydney got the white web material that you see all over during Halloween and spread that out to also apply to the poster.
The ribbon was also a black lace material woven in the shape of spider webs. Jennifer used my pink ATG to adhere the white webs to the board.
Sydney learned how to use the Xyron by running a spider through it and then we place a string on the glued area and covered it with the other side of the spider so that it had a front and back. In the photo above I am showing Sydney how to use tweezers to place the google eyes on it.
Here she is placing the little google eyes on him, she put two on each side.
Here is the poster almost completed. After looking at it she decided she needed a bug as she learned the purpose of the web is to catch bugs for the spider to eat.
Here is Sydney working my Gypsy Woman!!!
She used skittles for the top of the bug.
Close up of her beautiful face, she looked up just as I clicked.
Our completed bug! Isn't he handsome?
And Mr. Spider says yummy lunch is served!!! YUCKY!

We finished the afternoon off with some SPOOKY ORANGE hot chocolate with plenty of frothy whip cream on the top. It looked like a witches brew with the steam coming up!
Well I hope you enjoyed today's family project, we sure enjoyed having you in our home. Thanks for your sweet words of encouragement, I know Sydney will be thrilled with your comments!
signature