June 6, 2011

Blingy Baseball Cap


Lori here from ScrappinMyStressAway.  Today I am going to show you how to bling up a baseball cap.  I have 2 boys who play ball right now and we spend a lot of time at games.  I found this denim baseball cap on clearance a while back and thought it would be fun to add some bling to it. 

I normally do not wear hats, and I am not a super-blingy gal.  If you are, you can add more bling than I did to your own cap!!


I started out with a plain cap.  I saw another baseball mom wearing a denim cap with some iron on patches and jewels, but I could not find a patch that I liked.

I made a template of a baseball and punched out holes where the crystals will go.


 I taped my template to my cap.


I grabbed my Jolee's Jewel Hotfix Crystal Tool,  Jolee's red crystals and my iRock clear crystals.  I did not see that the red crystals were not hotfix (meaning there is no glue on the back).  I was super disappointed, but tried to make do....

I decided to use all clear crystals.


I did not really like the baseball in all clear.


I was trying to decide whether to buy the right red crystals or Jewelry glue and the glue won!!  I picked off the clear crystals one at a time and replaced them with a red one.


I have to say this was a pain!!!  I really prefer the hotfix ones!!  The crystals did not stick well to the denim.  The glue came out in blobs and when I tried to wipe the excess off, the crystal would slide.


Thank goodness I had the right blue crystals!!!  My oldest plays for the Titans, so I cut a "T" out of Varsit Letter so the inside was 2 inches tall.  I ran it through my Xyron and stuck it to my cap.


I used my Jolee's Jewels to adhere the blue crystals (Tyler's team color) inside the T frame.


I wore my hat to Tanner's T-Ball game today.  Tyler had a double header right after.  Tanner was so excited that I was wearing a T Ball hat ~ at 5 years old it is all about him :0)

Thank you Sheila for the opportunity to share my project on your blog!!

June 4, 2011

Gypsy Made Simple - Wedding Card & Blog Candy

Good morning! It is time for an easy Gypsy Made Simple project that is just in time for the summer wedding season. This year I will be ready and so will you. All you need to do is go grab a cup of coffee turn you gypsy on and let's get to work. We are gong to revisit a card we did months and months ago; the partial shape card. For those that have played along before with it the template on your Gypsy should say A2W. If you haven't click HERE for the original video. Note your template will be a 4.25x11" on one page and the page that you work on will be 4.25x9.5". Easy as can be and that is what you are looking at on this video screen.

This is such an easy card that can be made in a matter of minutes. I have to admit every time I use this style double the card so that I am doing 1 cut with a total of 2 cards. One for the occasion at hand and one for my stash so I am prepared.

Look at these yummy colors I am using. K and Company for the print and then Bassil solids. All cut like butter.
All my cuts are ready to be put together. I did them both at the same time as it was just easier.
Here are the little brides and the inside sentiment ready to go.

This is a quick little video showing how easy it is to assemble this little card. You will all want to make one when you see just how easy it is.

And here you go, both cards are done and ready to be signed. I just love the ease of this card. Ten minutes to design, 10 to cut and 10 to put together, that simple! Sure hope you enjoyed today's post and hope that you play along with today's card challenge.
I challenge you to make a Partial Shape Wedding Card of your own and link it up to my site. All linked cards will be eligible for the random drawing to win this car charger for your Gypsy. One of my favorite necessities on a road trip and for those summer vacations will be given to one lucky Partial Shape Wedding Card entry, all you need to do is link up your card by 8PM June 11th to be eligible. Winner will be announced on Sunday June 12th. Designers are eligible.
Thank you for your sweet sweet words of encouragement. Your comments continue to inspire me to continue sharing with you.
signature

June 3, 2011

All Wrapped Up

Good Morning!
This is Pam from The Bug Bytes.
It's my turn as a designer on SassyLady 's  blog. Thanks Sheila for having me on as a designer. Sheila is such a dear friend and inspiring person.
All Wrapped Up - Yep the last day of school so All wrapped up . So punny ( pun - fun! - I know my sense of humor needs some work! this week)  as today's project also uses All Wrapped Up cartridge.
Imagine sometimes makes something so easy especially when you  need to do lots of gifts and cards in a hurry and end of school year is just such a time.
So here are a couple of things I made


The paper at the back was also printed. I just used the proportion options - we have 4:3 ; 8.5:11 and so on . I chose  just one rectangle the 8: 10 one ( I think it is 10 not sure but the first digit was 8 for sure as I did not want to completely fill the 8.5 x 11 paper ) and filled it with the yellow pattern paper. Then I saw where on the mat it would go approx and placed the paper there.


I have used these two pages from the cartridge


Now for the box here is how it looks so you can see it does not have regular tabs like many boxes. You just score and the triangle sort of folds in. Of course you have to score on either sides of the triangle and the center rectangle too. Maybe this picture will explain better


Now instead of plain gluing I decided to run stitches too so that the box stays up when opened and also for a nice embellishment.  Then for closures I threaded some twine in. Yep I have added some skittles and stickles as more decoration


The inside view

This is how I started the thread (and also ended it. I added some double sided scotch tape so that I can fold the tab and stick it


This is how I anchored the twine. Look a bit unsightly doesn't it.
No problem we can just punch a circle tab and cover it up. That's why I like double sided tape.


Add some prima flowers on top , fill some chocolates or place the gift inside and tie it up and box is ready for gift to someone.

I also covered some chocolate bars with the printed paper and stuck the basket with gift card in it and here is another gift for someone.


So that Wraps up today's project. Thank you for reading and thank you Sheila for having me on as one of your designer at Sassylady's.
Have a great Summer!

June 2, 2011

"FLIP IT OPEN, GRAB A CARD"!!! CARD BOX

Hello everyone, it's Audrey again with another project to share with you.  Of course, thanks much to my sweet hostess, Sheila, for having me here.

I love boxes!!!  And recently I saw a candy box -- but what I really saw was a card box!!! Huh?  Okay what I mean is I didn't want to do another candy box but liked the candy box I saw as a card box, so I did a cutfile for myself to have what I wanted -- a flip top card box!  And I'm  going to share it with you so you can have one too.  This box, depending on the embellishments on your cards, will hold up to twelve 4.50" x 5.50" cards and envelopes.  Here's the box:


And here it is flipped open:

Now let's get to the tutorial so you can make one!  This box requires you use a 12" x 24" cutting mat, it's a one-piece box and it's rather big, so  you'll need:

1 - 12" x 24" sheet of cardstock for the box template
1 - 8.50" sheet of corresponding cardstock for the box panels
Glue of your choice
12" x 24" Cricut cutting mat

To begin constructing this box, I made and cut out the cutfile (the panels are included on the available cutfile):


Here's what the box template shape and panels will look like once they've cut:


As you can see from the picture above, after I cut out my file I included a step which will not be on the cut file.  After cutting, I scored and bone-folded the template.  It is unnecessary to do if you're familiar with folding cutfile templates; however, it makes it easier for me to fold evenly and makes neater edges on the final box:
:

If you'd like to do the same,  the scoring measurements are:

With 15" side across top  of scoreboard =  3.50", 5", 9.50", and 11"
With 9.75" across top of scoreboard = 1/2", 2", 7.75", and 9.25"

NOTE:  The longest end in width of the template has an added 1/2" added.  This will be referred to in this tutorial as the bottom end.

Again another unnecessary step but looks nice, I also clean up the small tabs on my template by cutting a pie wedge shape from each end of the smaller tabs.  (This is only necessary on the cutfile from the Plantin StoryBook cartridge; it is already done for you if you can use the George cartridge cutfile):


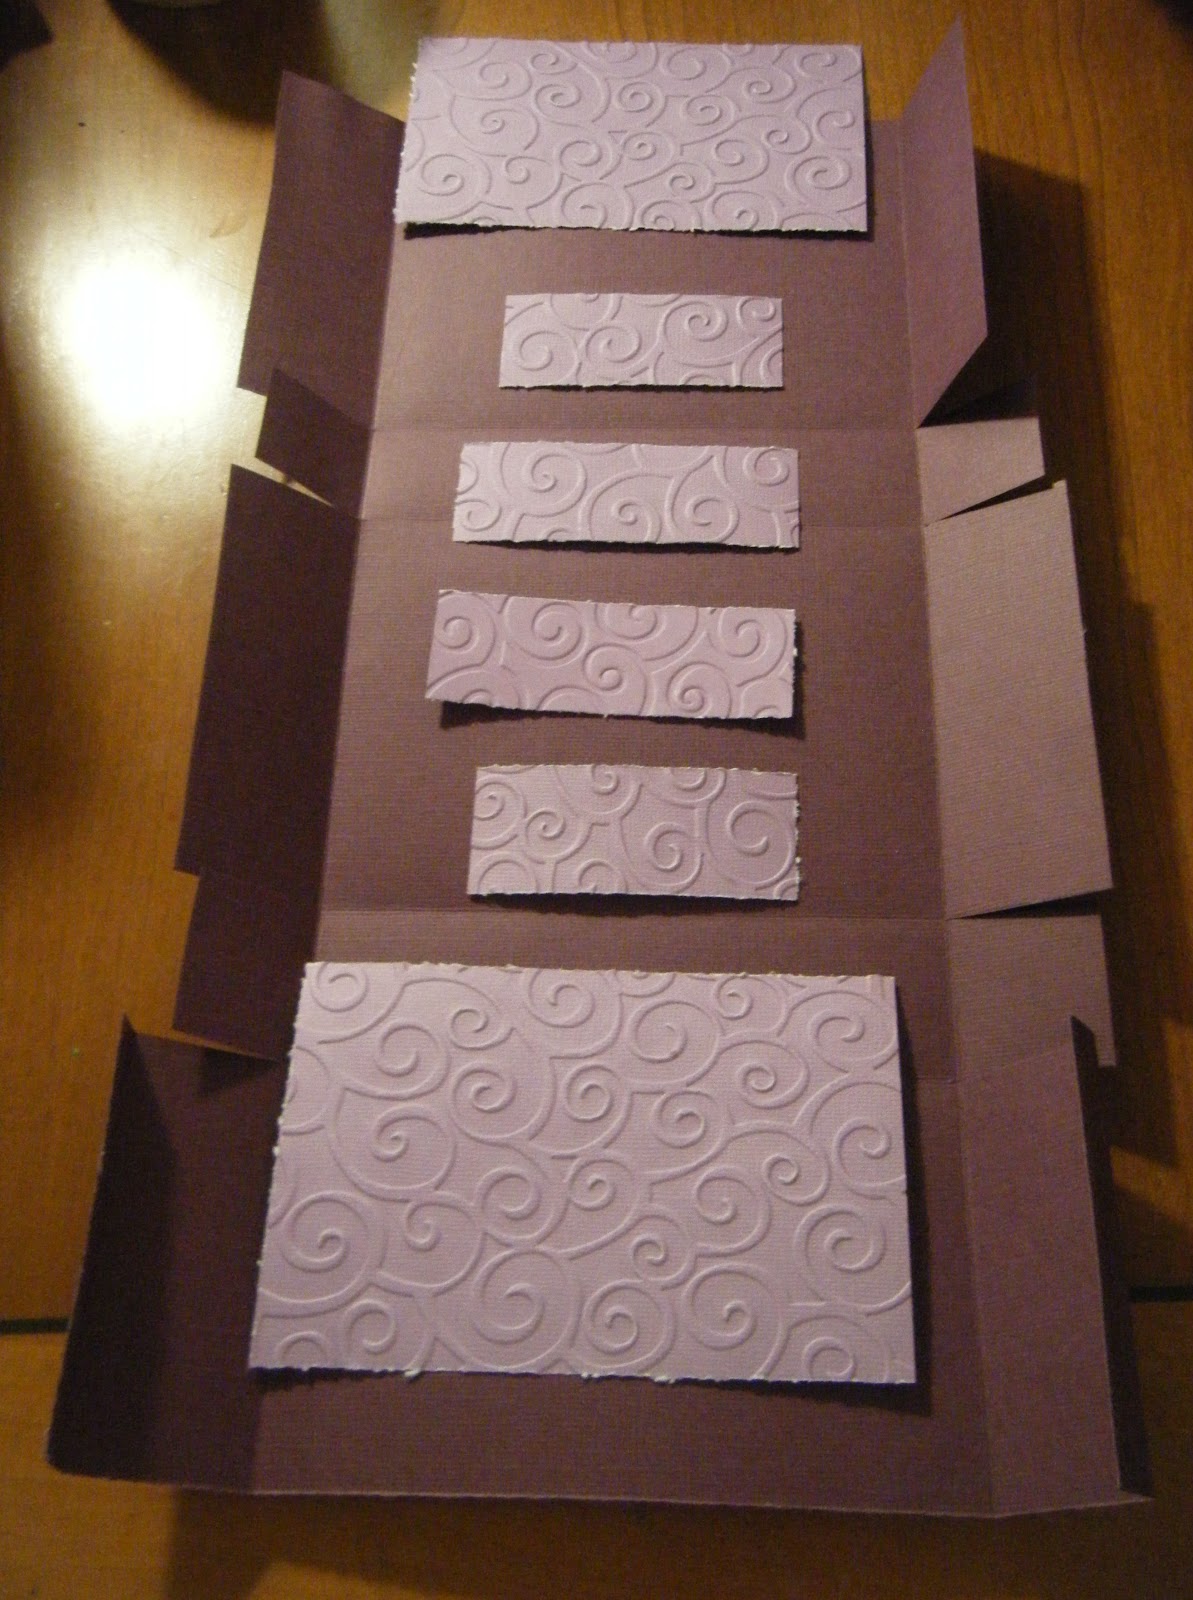
Next, I emboss my panels and all my pieces are now ready for assembly:


Okay, I'm going to put it all together!!!  First, notice the sizes of the panels are different.  One set is 1/2" longer than the other, this is important to know because of where they will be placed when glued to the box:


With my pieces ready, I began by gluing the panels to the box template, but I didn't glue on the middle side panels; I'll tell you why later.  The bottom of the box, where the 1/2 tabs are, is the longest end; the top  is the shortest end  The shortest side panels are glued at the top of the template, and the longest panels are glued to the bottom of the box template as shown below:


Again, please note, I did not yet glue the  middle panels on the side middel tabs!!!

To begin forming the box bottom, I folded up both score lines on each side as shown below: 


Next I glued the top on each of the 1/2" folds:


Then I brought up the whole bottom, carefully aligned it with the score lines on the next largest box square above it (skipping the short sqare), then glued it in place like this:


It is important that the 1/2" tab is aligned along the score lines on each side for the box to be proportionate.

Now I can fold up and glue the small tabs to the side of the box (I'm pointing out one of them to you on the picture):

  
I do not fold in the extending back side tabs yet!  Before I do this, I first turn the box to the other end (the top end) of the box; fold up the small middle tabs and add glue to the top each tab:


As I did with the bottom end, I fold up the side tabs, raise the entire top up to meet the middle tabs and align them with the bottom edge of the top and along the score lines, and glue in place:


Okay, the top of the box is done.  Now I turn the box around again and now do you remember those last back side tabs at the bottom I didn't glue earlier?  Well, it's time now to glue them in place.  Add glue and just fold them in place:


If you look closely at the picture above where the last back side tabs are glued down you'll see I made a mistake.  These side tabs extend slightly over the top edge of the bottom box it's adhered to, so I have glue at the top of the tab where it doesn't adhere to anything.  Don't make this mistake, glue only up to the point where the sides will adhere.  Fortunately, for me, this glue dries clear!

The reason for completing the top of the box before folding in these bottom tabs was just to make it easier to manuever and get my fingers in the top portion when gluing those smaller tabs in place.

Now for those last 2 middle side panels from earlier, let's get them glued on!  The reason they were last was because they needed to be aligned with it's companion panel on the front of the box.  If you look at where the middle panels are to be placed on the picture above, you'll see that because these panels are not on the same side tabs as the ones on the top of the box you can't judge how to accurately and evenlyalign them with the panel on the front until the box is completely folded:


See..., now you see where to evenly align the top and bottom panels to the front panel!

Well..., the box is now complete!!!  Let's have a look at it:


To close the box, simple pull down the top tabs of the box over the bottom box:


Lastly all I had to do was decorate and embellish it!!!  You can do yours anyway you like!!!  It's ready to flip it up to open and pull down to close!!!  LOL!!!

I hope I've made this tutorial clear and understandable; if not, please drop me a comment.. You can find the link to my blog by clicking on my name highlighted at the beginning of this post.

A cutfile for this box is available on my blog at the bottom (the very end) of my post today.  Again, use my name above to link to my blog to come over and grab it.  The two (2) files using the George cartridge and/or the Plantin Storybook cartridge are both on the available cutfile.  If you are interested in my converting either of these to Gypsy cutfiles, please let me know.

The cutfile will also be available on my side bar under the "Cut.Files" drop-down box within the next several days.  Please feel free to drop by later to check, if you'd like!

Hope you like the box, and thank you so much for stopping by!  Hope to see you next month!!!

June 1, 2011

Paper Piecing a Card

Hi scrappers, this is Kate from Sassy and Scrappy! Do you ever lose your crafty mojo or just get overwhelmed with projects you want, or need to do? I do. In fact lately I've been in a crafty funk. I wasn't sure where to start with my design team project this week so I pulled out this pack of Sassafras goodies that I recently purchased from Crafty Steals. As you can see from the picture below there's a lot of fun stuff! I also enjoy watching youtube videos, especially when I'm looking for inspiration. Recently I watched several videos by Kristina Werner and got inspired to do some paper piecing, so that's what I'm going to show you today.


Below is 1, 6x6 piece of paper that I cut into strips.


There is no rhyme or reason to my cutting. I really didn't measure them, I just tried to get varying widths from very thin to about half an inch.


I cut a piece of yellow cardstock (papertrey ink) to 4 and a 1/2 by 2-inches. I applied adhesive to my cardstock and grabbed one strip and started adhering. This technique really allows you to let your creativity flow. It's also a great way to use your scrap paper!


This is what the yellow cardstock looks like after all my strips have been adhered.


A view of the back.


Next I grabbed my scissors and started trimming. I find it easiest to cut from the back side.


Next came the process of designing my card. I used Aqua Mist cardstock as well as Aqua Mist Bitty Dots ribbon, both from Papertrey Ink. The grid paper is also Sassafras and it's cut at 4 and 7/8 by 3 and 1/4-inches.


I used foam squares to adhere the grid paper to my card base. For my sentiment I used 'Thickers' and then added three brads, also from Sassafras. After looking at my finished card I decided to round the top right corner with my 'Corner Chomper', it just looked like it needed a little attention.

Another view of the finished card.

I appreciate you all for stopping by. I hope this cheerful little card will encourage you to just pull out some paper and start creating. I've also used this technique on a scrapbook layout and was really happy with that result as well. If you decide to try this, I would love to see what you create. Please stop by my blog for more inspiration, I'd love to see you there! Have a great day!