December 7, 2012

Rudolph the red nosed Reindeer

Hello This is Pam from Papillon Digital Designs & The BugBytes today on Shes a Sassylady.
Thank you Sheila for having us in your design team and allowing us to post in your fun blog!
For today I have a card for you.

This cute digi image is from instyle stamps which came along with lots of images in a cd. Love this reindeer and had to color him. I decided to experiment and get bold with the background and colored the sky pretty dark . Colored with copics of course. The dark sky is using the B6 family ie B60-B69. Then it is feathered to V0 family and finally to YR0. While using copics I generally keep a scrap paper (a piece from the same kind of paper which I color and see how the colors blend and look by scratching in that) Guess the scratch paper practice stuck with me from watercolor days as my instructor used to ask us always to try on that before putting the brush on actual paper.

Well here is the card


The orange paper is really glittery and shiny

I have used Marianna Designables on the coredinations cardstock. Love how I can cut and emboss with it. I think the one I used is DS0907.  Then I rubbed the embossed paper with sandpaper to expose the white core.I have also used EK Success swirl punch on the edge. The reindeer image did not come with a background so I just sketched the snow and tree in.  I added some white snow with opaque white paint. I did add some glitter to the snow but you cant see it quite well in the photo. Some ribbons  and rhinestones to embellish. I punched out a snowflake from a paper to add as a medallion on the white ribbon. A Teressa Collins brad on the bow and a sentiment on the label inside completes the card.
Thank you Sheila once again and thank you readers for reading this post.
 Happy Holidays

post signature

December 6, 2012

A "SHOW AND TELL" PROJECT

Hello, everyone!  It's Audrey and it's been a while since I've been here.  I've missed you all!!!  Thank you Sheila, as always, for all your generosity.

Unfortunately, I didn't have time to prepare a tutorial and because I don't have much time I'm going to share a small project I made as a "show and tell".

Being that my circumstances hadn't allowed me to craft for the last 2 months I hurriedly delved into doing this simple little project as soon as I found I had some spare time the other day.  This project began with some Christmas ornaments  I'd purchased several years ago and never did anything with.  Knowing I'd need a few quick and easy Christmas presents, and not knowing when I've have extra time for sure, I came up with an idea -- I'll tell you what the idea is after the presentation as it won't be just to exactly hang on a tree... lol!

Now I'll "SHOW" you what the ornament I began with looks like:


Just an ordinary glass ornaments (the flat-round ones you get from Michaels -- cheap!).  Now here's what I did with them (click on the pictures for a larger and more detailed view):

 
Here's a side view:


Aren't they pretty?!!!  Of course they are!!!  Okay, let me "TELL" you how I embellished them.  I glued pretty trim around each of the ornaments and then glued a row of bling mesh to the trim, next I glued on some paper flowers and leaves that I highlighted with Stickles, and lastly I just attached some assorted complementary ribbon bows to the ring on the cap of the ornament along with another paper flower to cover the knots in the bows.  That's it!!!
 
Soooo, what's my idea for them?  Well, I'm going to fill them with bath salts!!!  Yep..., then I'm going to tuck them into organdy bags with matching tags -- which I haven't made yet... lol!!!   I think the quick and easy bath salt ornaments are going to be fabulous Christmas gifts!!!
 
I'm really am so happy to be with you all again, and I certainly hope to be back on my full-time schedule soon!!!  Keep the prayers coming!!!  My thoughts and prayers are with you all always!!!
 
I'll be seeing you!


December 5, 2012

December Daily


Hi scrappers, this is Kate from Sassy and Scrappy and I'm excited to share the foundation of my December Daily album with you.  I'm sure many of you have heard of this, but if not, it came from the mind of the very creative and talented Ali Edwards.  I purchased a kit from Studio Calico this year and it included the album, paper, embellishments, photo sleeves and stamps.

To decorate my cover I used some Mister Huey mist, twine, ribbon, border stickers and alpha letters.  My usual style is a little cleaner, but I'm happy with the color and texture. 


A picture of the inside cover of my album.  I actually love it and kind of wish it was on the outside cover, but it just felt too big and bulky.


These daily cards are a product created by Ali Edwards and there are a variety of colors and styles.  I chose to print my cards on kraft card stock with a green border.  The album is an off white color and so I didn't want to print on white card stock, I felt like it clashed.  I'm really happy with the way my cards turned out.


These 4x6 chipboard pages were also included in the kit.  Some of them I covered with paper and others I painted in coordinating colors.  I have an example of a painted page in the picture below.


Day 1-my apologies for the blurry picture.  The story I focused on was our annual family outing to the tree farm.  The journaling on the left tells the story of the picture and the rest of the day.


Day 2-a very uneventful day for me.  The picture shows a pile of "things" I collected during my errands.  Some days are a little less exciting than others, but that's life.


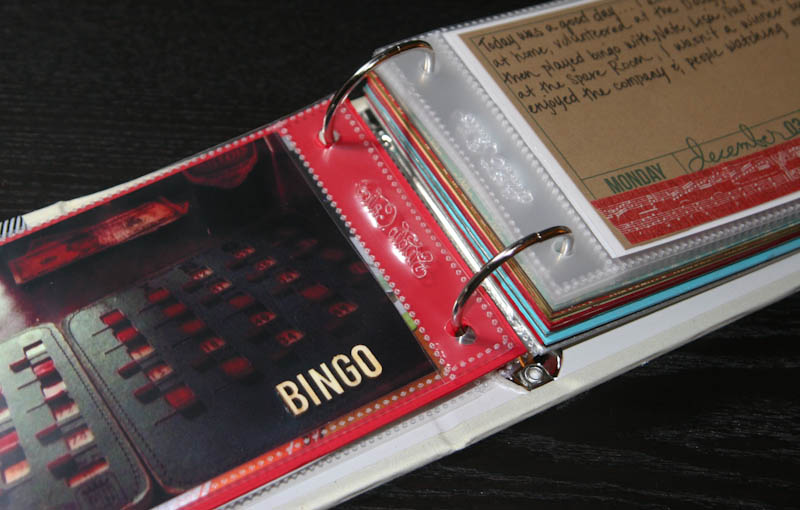
Day 3-I chose to use a picture I took while out with friends playing BINGO.  I love the wood veneer letters I used, and they seemed to fit the retro look of the BINGO cards perfectly.


Day 4-my sweet nephew in the tub.  I just can't get enough of that face.

And there you have it my friends.  Next month I'll include more photos from my album.  I'm sure it will include a lot more embellishments and details.  Thank you for visiting today and I wish you all the happiest of holidays.

December 4, 2012

Personalized Note Cards Make Great Christmas Gifts

Good morning. I am so excited to share with you today and I have a great little project that I am making for little Christmas gifts... personalized note cards! This was so much fun that when I finished I actually made a couple of cards for myself too! It was great to spend time in my craft room!


Now wasn't that easy and I got to try heat embossing for the first time! I loved it and I know I will be using that technique alot in the future as I love how finished it looked. Oh I have to tell you as I noticed I never said in the video... Mother is fine, terrible cold and sore throat the Dr. prescribed antibiotics and told her to follow up at her own doctor in a couple of days as precautionary to make sure it didn't go to pneumonia. Boy the calls kept going long into the evening too.

This is how the card looked straight on. Unfortunately the pictures don't show how shimmery it actually is. The cards turned out awesome and I used the same papers for my own... I just couldn't help it! LOL The litttle monogram is from Close To My Heart and is only $2.95.

Another close up. See how the base of the card had little holes cut in it. The papers were from My Mind's Eye Christmas stack and they were so shimmery.
And this is how it looked all wrapped up. I used satin ribbon to wrap it up knowing she could use the ribbon with her own crafting.
Thanks for joining me today. I hope you like today's project. Thanks for your sweet sweet words of encouragement. Your comments inspire me to continue sharing with you.

December 3, 2012

Music Soothes the Soul Canvas


Hello and Happy December!!!  I am so happy to be here at She's A Sassy Lady today!!

This is Lori from ScrappinMyStressAway with a great gift idea.  I started out with a canvas, some paint, paper and vinyl and here is what I created.


I painted a 10x10 canvas with purple acrylic paint.

I tore and inked some music scrapbook paper I bought at Hobby Lobby.  I used Glossy Accents to adhere the paper to the canvas.


Here is a close up of the inking.  I used Vintage Photo ink.


I opened my Gypsy and put a 10x10 square on my page.  I opened a second layer and sized this phrase to 10.00 width x 6.27 Height to fit my canvas.


I cut out the phrase in black vinyl.

When cutting vinyl, I set my Cricut to 3-3-3 (Speed, Pressure and Blade Depth) for a kiss cut.


I used my dental tool to weed out the extra vinyl pieces.

I used transfer tape to lift the vinyl off the paper backing.  I used my cricut scraper tool to burnish the vinyl onto the transfer tape.


I burnished the vinyl onto the canvas and carefully peeled off the transfer tape.


I sponged on a little purple stickles for some added sparkle!

This is going to make a nice gift for a friend :)

Thanks for stopping by today!!

December 1, 2012

Christmas Tags Swap With The Bugs Byte and Sassy Lady Designers

She's A Sassy Lady and The Bug Bytes took part in a Tag Swap! Wow we had so much fun and wait till you see the awesome tags.... Be sure to watch the video as you will see wonderful shots of each of these tags, better than I can take with a camera so I borrowed Pam's photos from The Bug Bytes as she is such a wonderful photographer.. The requirement of the tag was that it had to be approx -  6 1/4"x 3 1/8 and not too bulky while layering so that 15 of them should fit inside a small USPS flat rate box. We all went with the Christmas or holiday theme.


Here is a list of all the lovely designers who took part in this awesome tag swap
1) Sheila - http://shesasassylady.blogspot.com/
4) Elizabeth –   http://217creations.blogspot.com/
6)   Michelle -  http://ladyofleisureink.blogspot.com/      
7)   Jeannie - http://nonnasscraps.blogspot.com/      
8)   Beth -  http://thunderbirdlindybydesign.blogspot.com/
9)   Lisa -  http://momtooneson.blogspot.com/
10)  Denine - http://www.pumpkinspiceblog.blogspot.com/    
11)  Carolyn - http://cccscraproom.blogspot.com/      
12)  Charlotte - http://alittlebitofdetail.blogspot.com/      
13) Jennie - http://javajencreations.blogspot.com/      
14)  Cheryl - www.cherylswindow.com15) Pam - http://www.thebugbytes.com & http://papillondigitaldesigns.com/


Pam and I split up the responsibilities, I organized and she got to have all the tags mailed to her and then mailed them all out.... She got to see them all first and what a joy it must have been for her. She said she was shouting with joy as each box arrived at her home. She got a little sneaky on us at the end and didn't tell us when they were put in the mail.... before you knew it they were at our door and we all were delighted.
Now for the pictures they are Pam's and I literally took them right off her blog so they are in the same order that she published them. 


2) Lori sent this cutie. Love the rich colors. Love that pretty blinged newsprint star  and how she cut the 25. Her blog - http://scrappinmystressaway.blogspot.com/ . Do read her blog post about the tags to see the details in the making of this tag - http://scrappinmystressaway.blogspot.com/2012/11/tag-swap-beauties.html


3) Cricut couple sent this wonderful tag. Love the colors chosen. That pink snow flaked paper is so so pretty. Their blog -  http://cricutcouple.blogspot.com/


4) Elizabeth aka makeupgirl217 from http://217creations.blogspot.com/ sent this Tim Holtz tag. The background is canvas. Love the texture on this one and the way she weaved the wreath/garland around the reindeer's neck. And the jingle bell. Love it!


5) Melissa from http://melissamade2.blogspot.com/ sent this lovely colored tag. It is a flapped tag so that we can add a message inside. Love that reindeer with that big nose. Cute!. I also got a cute colored card in the box she sent me. How sweet! 


6) Michelle -  http://ladyofleisureink.blogspot.com/ sent this wonderful tag. Love that blue colors and the candy dots on the tree as ornaments and the snow texture. Awesome. She also sent me a very pretty card. I will share the card on another post along with Melissa's lovely card. I tell you I have seen our designer's work on the blog but they do not come close to seeing, holding and touching their wonderful creations in person!!
Michelle's tag came in the lovely sealable plastic cover with her blog and detail on the label used as closure. Isn't that a wonderful idea. I so loved it that I copied the idea . I ordered some bags for my tags too and printed on a Avery label. So easy to design on their software and then print it out! And she has a blog post about all the lovely tags - http://ladyofleisureink.blogspot.com/2012/11/tags-galore-part-1.html


7) Here is Jeannie 's - http://nonnasscraps.blogspot.com/  Beautiful tag. Love the shape of the tag. Her layering style is awesome.I still enjoy looking at the card she once sent me. The layering in that was beautiful too. She is such a sweetie.


8) Beth aka thunderbirdlindy from  http://thunderbirdlindybydesign.blogspot.com/ sent this gorgeous tag. Love the blue color and the way she has attached the fence. That faux rosette is so cute (which I think is from the close to my heart artiste collection if I am not wrong) Awesome!


9) Love this action tag - another wobbler tag - this one an adorable elf from Lisa - http://momtooneson.blogspot.com/ .I love the texture she added o the string the elf holds. Awesome job Lisa


10)  Denine - http://www.pumpkinspiceblog.blogspot.com/ sent this little beauty. Don't  you love tree with those different pattern papers . I Love how she has used so many pattern paper but still they look unified!

11) Carolyn from http://cccscraproom.blogspot.com/  sent this lovely tags. So richly embellished. Head on to her blog to read her blog post about the tags if you want to see the items she used to make this awesome tag. So many stamps and dies for both the front and the back. Love it. http://cccscraproom.blogspot.com/2012/11/2012-christmas-tag-swap.html


12) Charlotte from http://alittlebitofdetail.blogspot.com/ sent this cute vintage tag. Love the colors. That blue is awesome against the beige/sand color and the reindeer die cut on that cute label with the bling is so perfect! 


13) And this gorgeous purple colored tag is from Jennie aka Javajen - http://javajencreations.blogspot.com/. Love that shade of violet/purple. The ribbon she has used is so cute!


14)  Cheryl from www.cherylswindow.com sent this gorgeous card. Ooh the texture on this one!. She is so good with multimedia ! This one is so rich in texture like Elizabeth's tag. Cheryl also has a lovely blog post up - http://cherylswindow.com/christmas-tag-swap-using-sizzix-eclips-and-stamp2cut/


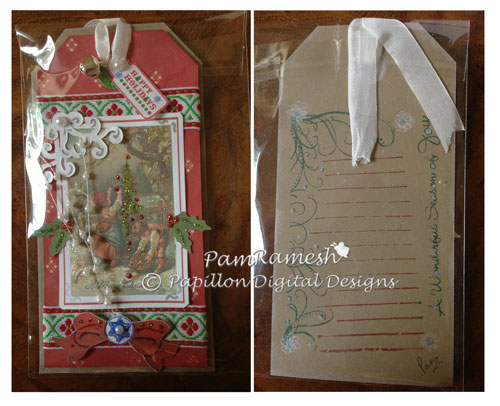
And lastly Pam's tag. Isn't it just beautiful.... and the detail was amazing. Her machine cuts in much greater detail than I seem to get done and then look at that vintage photo! She had little pearls and even a bell at the top. Pam is such a wonderful designer I know you will want to spend a lot of time on The Bugs Byte.


Along with the tags, Pam also made a card to send along inside each and every package. She is so considerate and we all love her for the extra things she does to make everyone feel special.... We all thank you Pam! 


Now Pam wrapped up all tags before sending them off to their homes. She used these lovely muslin bags from http://statelinebag.com/muslin-bags/premium/  . Stamped them using versacraft black ink which can be used on fabric and wood - They are assortment of stamps mostly  from paper trey ink and a few from CTMH I think. http://www.amazon.com/gp/product/B00161Q1MI/ref=wms_ohs_product
Then I colored using copic markers and added some diamond stickles.

Pam and I send a special thank to each designer for their hard work, they are so talented. I hope you enjoyed today's post.... know that I literally helped myself on Pam's blog for the photos and the information on the bags. Thanks Pam! The video is me though! All mistakes and all! LOL
Thank you for joining us today. And, thank you thank you for your sweet sweet words of encouragement. Your comments continue to inspire me.