February 22, 2012

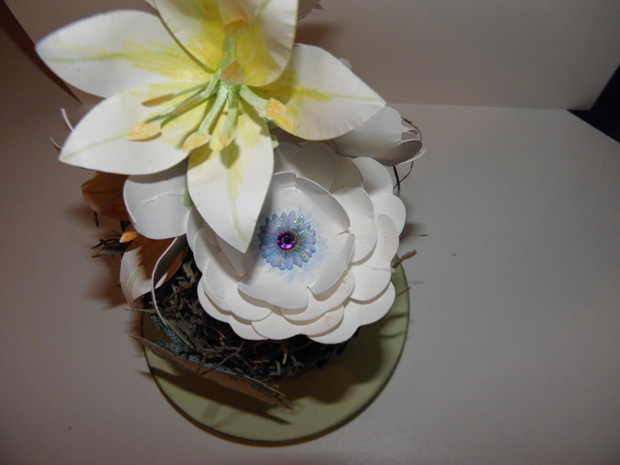
Tea Cup and Bouquet


Hi everybody, Beth here from thunderbirdlindybydesign.  Today I want to share with you a project I made with TBBM2.  I just got this cart last week and I am in love.  It has so many must have cuts on it.  A milk carton, gable box, and more.  It also has this darling little tea cup and saucer.  I sometimes arrange flowers for entering them in our county fair.  I have also done 2 weddings arranging flowers.  For the entries into the fair, you must use flowers you have grown yourself.  Unfortunately, nothing blooms in Northern Indiana this time of year.  I do miss my garden, so I thought I would try my hand at paper flowers. 

I got the idea for the Lillies from an artist by the name of Susan Tierney Cockburn.  I ran across a video featuring her this past week, but had heard of her books for sometime now.   I have just never gotten around to trying the technique. 

For this project, you will need the following:
TBBM2 tea cup and saucer cut at 10.5"
I also used for the flowers, Flower Shoppe, Chistmas Cheer, and 3 birds.  You wouldn't have to use these carts if you can find similar cuts off of the carts you do have.
Floral Foam small piece
Spanish Moss, small piece
White Cardstock for flowers
Colored cardstock of choice for tea cup
green cardstock for base of lillies
Colored pencils
adhesive, I used both Crafters Pick Ultimate and my hot glue gun.
floral wire for stems
also you could cut the snowflake shape for the lilly base on your cricut, but it was faster for me to use a punch.
Mcgill tools and a soft surface to cup the flowers, I used a silicone mouse pad.


I am not going to show you how I did the lillies, but you can find the instructions by watching her video.  I did use leaves from 3 Birds for the Lilly leaves, and the funky snowflake cut inside the circle for the stamens inside the lillies.  See both pics below.  I also used the snowflake punch for the base of the lilly.  It has a technical term, but I can't remember what it is.

3Birds

Christmas


For the peony like flowers, I used Flower Shoppe and cut 4 different sizes of flower.

After you cut these, leave them on the mat.

That is where I colored them at, it's easier. After coloring take a makeup sponge and smudge the color around the flower to mute it.

Pull them off the mat and using the largest Mcgill tool with the ball place the flower on the silicone mouse pad and rotate the tool around the flower to make it cupped.  Her video above shows how she did it.


Cupping the flower


After they are cupped.


Flower assembled


Stem Hot glued on back.


Finished Flower.

After you are all done making your flowers, place floral foam down inside tea cup.  Arrange flowers in cup and put the spanish moss over the foam to hide it.  Decorate cup as desired.


I hope you enjoyed my project today.  I had fun making it.  A Big thanks goes out to Sheila for having me as a guest designer on Shesasassylady.

Beth.

February 21, 2012

V-Day Card Party Update...

Hi everyone! This is Kristy from craftin-on-my-door and I want to thank Sheila for allowing my to be her guest designer again today! I look forward to my monthly She's a Sassy Lady posts!
This month has been busy and crazy! So today I simply have some fun pictures to show you, that I hope will bring you all a little inspiration! I was so excited when Sheila introduced her card party. HERE is the link for Sheila's party.  And I was even more excited when a friend of mine decided to throw one! I was the lucky girl that got to make the favors. We had a valentine's theme and everyone made a Valentine's card and then brought the supplies for 5 of us to make the same card. Here are the cards:


 This is one of the cards I made.

 This is the other card I made (I made them for my mom since she's so busy with work and school!)
I thought that they were all adorable and it was so nice to have cards ready! We may even start this card club monthly with a different theme each month.

Here are the treats I came up with (can you tell that I LOVE Valentine's Day?!)
I made chocolate covered oreos and found some really cute molds at JoAnns. I also decorated these yummy caramel chocolate hearts!

 These were cute little notebooks that I found at Michaels. I dressed them up and thought that they would be cute for the husbands and wives to write little love notes back and forth to each other.
 Lastly, I made a larger version of the heart peppermint bark for each of the ladies!
 I hope these pictures will inspire you in either your card making, party planning, or just crafting! Thanks for stopping by today! ♥Kristy

February 20, 2012

Do you KRAFT? Inking Background Tutorial

Hi ya everyone - Melissa from Melissa Made here today to share a simple tutorial on creating your own paper using Kraft.  I colored this gorgeous Some Odd Girl beauty with my Copics.  I imagined her in a vivid red dress with luscious dark skin, so that's how I colored her.  I quickly realized I couldn't find any paper that matched however.  I decided to ink a background using a Spellbinders Impressabilities.  Here's how:
Thanks for watching my video and simple tutorial.  Many thanks to Sheila for allowing me to share with you all again today!  If you are interested in more fun projects or a class in coloring with Copics stop by my blog - Melissa Made - for more details!

February 19, 2012

Thank You Card-Sassy Starter Sunday


Uploaded from the Photobucket iPhone App


Hey Ya'll!  It's Leah from "My Craft and Chat Cafe."
My 19 y/o DD asked me to make her a few "Thank you" cards, so I thought I'd make that my project to share with you all here at Sheila's awesome blog, "She's A Sassy Lady."


Uploaded from the Photobucket iPhone App


I used the butterfly on page 53 from Cricut Art Nouveau.  Using my Gypsy, I cut the different layers at 2.75 inches.  The colors are Stampin' Up! Lucky Limeade, Pool Party, Peach Parfait, Calypso Coral, Poppy Parade, and Soft Suede.


Uploaded from the Photobucket iPhone App


A 5 1/2 x 11 piece of Stampin' Up! Soft Suede folded in half makes the card base.


Uploaded from the Photobucket iPhone App


Here is the first layer.  A 5 1/4 x 4 piece of Stampin' Up! Lucky Limeade with a 5 x 3 3/4 piece of Stampin' Up! Everyday Enchantment Designer Series Paper layered on top of the Lucky Limeade.
Uploaded from the Photobucket iPhone App


A Piece of ribbon from Hobby Lobby to make a bow.


Uploaded from the Photobucket iPhone App


A closer look at the butterfly put together.  
The second layer started with a 4 1/4 x 3 3/4 piece of Stampin' Up! Calypso Coral cardstock, then a 4 x 3 1/2 piece of Stampin' Up! Soft Suede cardstock, next a 3 3/4 x 3 1/4 piece of Stampin' Up! Whisper White cardstock.  


Uploaded from the Photobucket iPhone App


I used the "thanks" sentiment from the Stampin' Up! So Happy For You stamp set stamped with Stampin' Up! Soft Suede Classic Ink.


Uploaded from the Photobucket iPhone App


A few Stampin' dimensionals pop it up!  And there you have it!  Thanks for looking and, Sheila, thanks for having me. Until next time....

Crafty hugs,
Leah

February 18, 2012

Winter Scrapbook Page & Weekly Challenge

Today I bring you another layout for my 2012 scrapbook.  I used my Gypsy and some yummy paper from DCWV Christmas stack and plenty of Martha Stewart Glitter to put this page together. I did only one page as we don't do much during the winter season other than work. We are summer people, yet living in the south really makes for mild winter compared to those icy temperatures and blistery winds that Chicago offered! Yes, I do love living in Alabama.

Here is the layout on my Gypsy Woman. Note I did move those snowflakes around but I really like the way they turned out. Below are the different layers.


Note I have not placed the mats as shown on the left of the screen but they are ready to be cut.... At the last minute I wasn't sure I wanted them so I have them if I change my mind.


Now this is a quick layout and I think you will love seeing the papers on this video as they are so awesome. I love these quick layouts and they look so pretty on the black pages this book offers.

Here is a close up of the heading and in getting it ready I applied glitter and then ran it through my Cuttlebug to make sure that it adhered all the way . Click HERE for a quick video showing the technique I use.

Here is the snowflake that I had leftover from the video and decided to use the one I had made up rather than one I just cut.
This is a close up of the other snowflake using the Martha Stewart fine glitter. Love the effect of using them both on the same project. Now if you too would like this Gypsy file just click HERE to download.
I hope you liked today's project. I challenge you to use something with glitter in it this week, It can be a page, card or craft but you must use glitter or stickles.  Then just link up your project by 4PM on Friday the 24 of February to quailfy to win a stamp set by Studio 12. Winner will be chosen by Random.org and announced Saturday morning.
Thank you for your sweet sweet words of encouragement. Your comments inspire me to continue sharing with you. Have a blessed week!

Weekly Challenge Winner From Week Of 2/11

Good morning.... We had some great entries this past week. I hope you take a minute to check all the different blogs represented.
This week's winner is Jen L from 3 Cats & A Bug. Jen you have 1 week to contact me and send me your name and address so that I can get your gift in the mail. Just click contact at the top of the blog and you will email me.
Everyone be sure to enter next weeks challenge.... it's a real easy one!