







December 10, 2015

It's Beginning To Look A lot Like Christmas!

Hello everyone! Java Jen here from JAVA JEN CREATIONS! Sorry I've been MIA but I encountered a personal health crisis at the end of the summer and am just now getting back to doing things I enjoy! So thankful for the provision of the Lord in my life!!   Well, I've been making lots of items to sell and here are a few! Not a lot of instruction in this post but if anyone has any specific questions, feel free to ask! 


Stamped coffee cards


I'm taking special orders for frames like these!


Also taking orders for these! <3


Taking orders for these that display my grandchildren's artwork! :-)


I made lots of Christmas banners!


The Christmas Joy Foldout in Cricut Design Space is very popular and I love how it looks!


Did this sign in vinyl and took the back off the frame to let my wall color show through! 


These mugs have been another great seller for me too! 


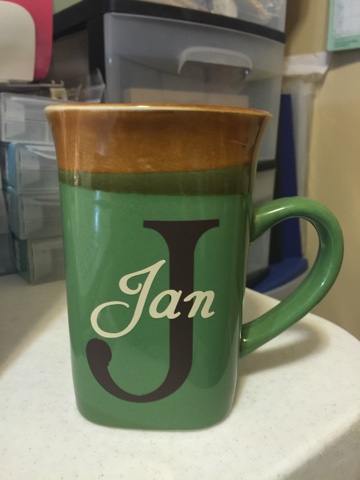
These monogrammed mugs are my latest project and they are selling like hotcakes! I'm so excited! 

Well, that's all I have for today! Thanks, Sheila for letting me share today! My prayer is for everyone to have a happy, blessed and healthy Christmas !! 


December 9, 2015

Santa's Sleigh Treat Boxes

Happy Holidays!  It's Christine from iamcocoasmom.blogspot.com sharing one of this year's Christmas projects with you today.
 
Fifty or so report cards due to be carried home in little Kindergarten backpacks midway through December meant that I never had time to craft any of the cute treat holders that land in my Pinterest feed.  How I longed to make the Peppermint Patty snowmen or the Santas with candy filled dangling legs for all my Kinders!

When I retired, I began a new tradition - The Great Pre-Christmas Craftathon and this is my third season of treat making for friends, co-workers and the OHM children.   : )  : )  : )  This year I really, really wanted to make a sleigh containing chocolates and candy and here it is!


And here are my Notes To Self on mass production treat crafting with the Explore!

*  Keep the container simple.  There are some beautiful sleigh svgs available with wonderfully ornate runners.  Choose a relatively simple design like the one I used this year from Lori Whitlock.  The runners are glued on the side of the sleigh body rather than supporting it from underneath.  Much easier to mass produce!


*   Choose a design that does not waste paper even though there may be extra construction steps.  Since the sleigh side pieces are separate from the body, I could get 3 small sleighs from one sheet of 12x12 card stock.  Gluing the pieces together was easy and worth the paper I saved.


*  Choose a design that 'ungroups'  in order to save yourself from the work of eliminating pieces by using the 'hide contour' button.  I liked using different patterned paper for the body of the sleigh and this was very easy to do by changing the color on the Design Space canvas.


*  Do not try to cut ALL the pieces at once.  My browser/router/DS/computer configuration does not like me to make more than 9 project copies so I go back and re-cut a mat as many times as needed by clicking on its icon and making 9 at a time.  

*  Add embellishments punched from scraps of paper and don't forget the MISTI for stamping the sentiment.


*  When selecting the candy for the treats, include DH's favorite kinds so he'll volunteer to pack the treats for you.  LOL!


Thank you Sheila for letting me share today.  Happy Holiday Crafting everyone!  : )  Christine

December 8, 2015

A Jolly Holly Christmas - Act Three

Christmas approaches and we may have need for some last minute cards.  Here are the last three cards in the Close To My Heart White Pines collection I began presenting two posts ago.

Supplies used are listed here.
Edges of  some cards and pieces of cardstock used are inked with complimentary color.
Both the card above and the card below use zip strips to accent and add interest.  Using White Pines complements to create the scene is quick and easy!
The Colonial White cardstock shape on this card is cut with the Artistry cartridge -  Real Dial size, 3” Shape <h> Page 26.  Attach the acetate shapes to the card with liquid glass, which will dry clear.
Again, White Pines complements create the scene.  Use Fern Cardstock -4 ½" x 3" (cut Banner into one end) and Colonial White Cardstock –4" x 2 ¾" (cut Banner into one end) for the background to the scene.

I hope you've enjoyed seeing how these cards are put together.  If you have any questions about this project, please contact me.  Best wishes for pleasant holidays.

Blessings,
Isaiah 30:18

December 4, 2015

Christmas Countdown

Happy December Sassy Crafters!

Ah the holiday season is upon us. Thanksgiving was last week (which was awesome to spend with the family sharing stories and eating great meals) and by the time this posts, Christmas will be 22 days away! Eeeek! I started Christmas shopping, the tree is trimmed, stockings are hung, but something was missing! I decided to make a countdown calendar. I add little treats or notes each day until Christmas! Side note, the song "Final Countdown" is in my head...thanks Europe and thanks Geiko!
Anywho, I purchased the file (3D Countdown Box Calendar) a couple of years ago from the Silhouette store. Lori Whitlow, the creator of the file, has a wonderful tutorial on how to assemble it. I made this before, so I was able to do it easily by memory. For this project, you will need:

1: 4 12x12 sheets of cardstock or pattern paper for the base 
2: 9 12x12 sheets of cardstock for the boxes
3: 1 12x12 sheet of pattern paper as the decorative parts for the boxes (I used Winter Combo)
4: 1 sheet (scrap piece works fine) for the numbers
5: embellishments to decorate the calendar (optional)


It took me approximately 1.5 hours from start to complete the project. I recommend starting with the frame first so it can have time to dry (liquid glue is best) as the boxes cut and are assembled. 

I was able to get three boxes on one sheet to cut. 
As the sets cut, assemble the boxes and add them to the frame. 
Once all of them are assembled, add the decorative front to the boxes and numbers. 
I decided to just add the penguin (Lawn Fawn) to the 25th and a sentiment to keep it very simple (since the children will be handling this). However, this box can be as dressed up as your imagination allows. 


Well I hope you enjoy today’s project and that you will give it a try! Until next time….sing your favorite holiday songs and be creative! Kenya~

December 3, 2015

Snowman Note of Thanks

Hey everyone, it's Sonya from Sonya's Paper Trail.  I had a request to make a few holiday/winter thank you cards and this seemed like the perfect day to share one of those creations! 

Check it out:


I used retired stamps from SP&Company called "Falling Snow" for the image  and "Just a Note" for the sentiment.  I colored the snowman with Copics and added a few Stickles for wintery accents on that fun snowman.  I paired some Echo Park snowflake paper along with an embossed sheet of white cardstock for the mat of this card.  

I want to thank Sheila for the opportunity to be a part of her blog the last couple of years.  This is my final post as a design team member and it has been a joy to work with Sheila and the other lovely designers.  I wish them all very well and a wonderful holiday season.  Many thanks!

Cheers!
Sonya


December 1, 2015

Polar Bear Christmas Tags


Good day! Hope you are having a great day and are once again ready to work on a Christmas project. Let's get to work. This is another over sized tag. It is a little over 6 inches high and about 5 3/4 inches wide if I remember correctly. I made them on my Explore and it was very easy to cut.


As you can see this was a VERY-VERY easy tag to put together. My grandchildren all love animals so this year I made 3 different tags of 12 each and all are winter animals.


I love that I can let my machine do all the work and I just use a little glue and ribbon and they are done. Thank you for joining me today. I hope you enjoyed today's post and you feel motivated to get your tags done too.
Have a blessed day.







