


Not a "blue" birthday in the true sense of the word, but I haven't made a card all in blue and I wanted to try this out to see what it would look like.
I have been doing a series of folded cards on my blog and thought I would share a relatively easy one with you. This is called a Side Diamond Springfold card.
Out of one piece of 8.5" by 11" card stock you can make two card bases. Your finished card will measure just under 4" by 5.5" (at the widest point).
To start you will need a piece of card stock measuring 8.5" by 5.5".
You will score along the 5.5" side at the 2.75" mark. Turn your paper and score, along the 8.5" side, at the 2.75" and 4" marks. Should look like this so far.

Next fold the long score line so you have a 2.75" by 8.5" card. Have your open ends at the top (doesn't really matter but its easier as I have labelled the score marks), you are going to score on the diagonal from the top of the 2.75" mark to the bottom of the 4" mark whilst your piece is folded. Like this.

Now open up your card and you will have two diagonal folds and nicely centred, like this.

Now we need to fold the score lines. The two short score marks (the 2.75" and 4" marks) you need to make these valley folds. Your long fold down the middle, and the diagonal folds will be mountain folds.
In the next photo I'm hoping you can see how I have folded the folds LOL. It will make it easier to finish the last fold if it looks like this.

To finish the folding, start off like this (I used my daughter Shannon again - her hands come in real handy LOL).

By pushing on the left side of the card you will bring the diamond down, like this.

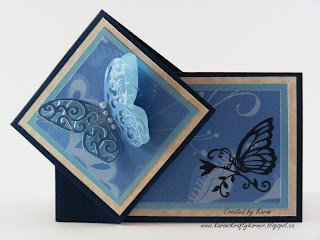
And this is your finished card base.

Now comes the fun part. We get to decorate it:-)
So, if you open up you card so the long mountain fold is to the right, you can decorate what is going to be the front of the card.

My layers were cut at 4.25" by 2.5", 4" by 2.25", 3.75" by 2". On the last layer I stamped a butterfly from a Recollections stamp set.
Next, flip your card over and decorate the inside and outside diamond (if you are going to use an image that needs to be a certain way up, make sure you have the orientation right, because when you close the card up, the diamond twists.

My layers for the Happy Birthday (inside of the card) were the same as above, I used a stamp from the CTMH stamp set that comes with Art Philosophy package.
For the diamond, my square layers were cut at 2.5", 2.25" and 2". I would leave adding any embellishments to this diamond until you have finished your card.
Here is a picture showing the best place to position your glue for closing and securing your card.

To finish off the front of my card I used the Art Philosophy cartridge and the butterfly (page 55) cut at 1.5".

I added some little pearl dots to finish off the butterfly and embossed the base layer, of the butterfly, with my Cuttlebug and the Devine Swirls folder.

Well I hope you all enjoyed this tutorial and will give it a try.
Happy Crafting.
Karon


16 comments:
What a beautiful card. Love all the intricate folds and the final shape of this card. Great color choices too. Thanks for the tutorial, it was easy to follow along. Thanks for sharig today.
Very lovely! Can't wait to try this fancy fold.
Very pretty card! Thanks for the tutorial on this; I'll have to give it a try.
Oh Karon!!! How beautiful! Love-love the blue and the butterflies! Thanks for the great tutotial!!!
Thanks for your lovely comments:-)
Great tutorial Karon, the Diamond fold is one of my favourite's, so many variations but always so pretty :)
Your colour choice of blue is lovely
Hugs
Adele
I've never seen a side diamond car, Karon. Thanks for the tutorial. I'll definitely try it!
Evelyn
This is a beautiful card, thanks for the tutorial, I am going to give it a try!! Your colors are beautiful!
cathyplus5.blogspot.com
Karon this card is adorable!! Love that fold ~ thanks for the tutorial. Thanks also for the kind words you leave on my blog :)
Wow Karon thank you for this tutorial!! I will have to give it a try. This card is adorable and I love the colors you chose!
Beautiful!!!!
I can't wait to try this, TFS!!
CONGRATS my friend. You are a very talented crafter and Sheila recognized that. Love your card and what a fun fold. Gotta give it a try. TFS.
dmcardmaker (at Aol)
(and Cricut MB)
What a gorgeous card! Thanks so much for sharing the instructions! I am so going to try this one!! Love it!
Candy
Thank you all very much for your thoughtful comments - if you do make it will you let me know so I can see all your wonderful creations.
very Beautiful!Great Job!
Oh Wow Karon! I am totally going to scraplift this! It's AMAZING!!!
Post a Comment