February 28, 2010

Regina's Top Secret Taco Soup


Don't tell Regina I gave this to you..... she is my lovely daughter-in-law. It is a little chilly here in Birmingham today as well as many other places across the country and thought you might like to make some. It is so easy to make yet really yummy.

Ingredients:
1 pound ground beef
1 pound ground pork (or bulk sausage)
1 can or chicken broth
1 large can stewed tomatoes, diced, with juice OR large can Ro-tel
1 16 oz. jar chunky salsa
2 cans diced chilis with juice
1 can pinto beans with juice
1 can black beans with juice
1 can corn with juice
1 pkg. taco seasoning mix

Directions:
Sprinkle beef and pork with the seasoning mixes and then brown. Add remaining ingredients with all their juices. Add salt to taste. You will need a surprisingly large amount of salt as well as seasonings.
Serve with freshly minced cilantro and a dollop of sour cream if desired. You can also dice Mexican melting cheese into ½ inch squares and place them in the bottom of the bowls. Spoon hot soup over cheese to melt. You can also sprinkle with grated cheese rather than the sour cream. I like to eat with tortilla chips. Yummy.
Number Of Servings:A Bunch
MyFreeCopyright.com Registered & Protected
signature

February 27, 2010

Another Sunshine Award....

Good morning everyone. I received another Sunshine Blog Award! I am so thankful that Monique, a fellow Cricut MB member, a follower and an extremely talented scrapper thought of me! Monique’s blog is called Simple Things Make Me Happy and I really hope you get a chance to go visit her blog.

This is so exciting because Monique is from the Netherlands!!! My grandson Justin will be so excited as he loves to see where followers of my blog are coming from, so he checks out the little flags on my site.

Here are the rules:
1. You must pass this award on to six (6) other bloggers/followers.
2. Link your nominees within your post
3. Let your bloggers/followers know you are passing this award to them by leaving a comment on their blog.
4. Add a link to the blog of the person from whom you received this award

I would like to present the awards to:
These New Bloggers hoping that you will stop by each of them and encourage them in their new endeavour.
Precious Memories Scrapbooking and More
Just2Ducky’s Daily Life and Creations
Card Making Corner
KE Creations
Never Pay Full Price
Cuttle Faries Express
Thanks for stopping by today! Please take a minute and go visit each one of these new bloggers listed above and encourage them by leaving a comment. Have a wonderful day
signature

My Prize Came!!! Thank You - Thank You To The Cuttlebug Challenge Blogspot!!!

Look what arrived in the mail - my new Love Struck cartridge and this beautiful handmade card!!! Yeah!
It came Thursday but I didn't get off work till late and I really want to thank all the ladies at the Cuttlebug Challenges Blogspot for the generosity! Just a little reminder for everyone to check out their blog daily as there is always something exciting happening there. Be sure to click HERE and take a look at what they have happening today.
signature

February 23, 2010

In Like A Lion, Out Like A Lamb

Don't you just love it!!! This is our March calender Wall Hanging sits in our foyer.... Hubby and I use it to communicate... we add notes or leave comments for the other by filling out little green shamrocks and clip them to the black cord with a little closepin! The frame is from Creative Memories. In like a lion out like a lamb is our hope for this year.
This is how my design looks on My Gypsy Woman.... gereral on the first page and then I pulled out the other pages as shown below to accomidate the different colors. I used my February calendar, adjusted for the new month, added two days and called it a success.
I then chose my colors to go with the yarn that I got from Jen... it just didn't make sense to buy when she had leftovers and all I needed was 2 to 3 feet. My paper is from DCWV.
I cut the entire project and then seperated each section to make it easier to put together. I started with the hardest part first.... the calendar. After removing from the mat I stickled the days of the week and set aside to dry. The tedious job of placing the numbers on was made easier with my tape. Unforturnately I wasn't skilled enough to get the back off the mat without pulling up some of the letters too so I couldn't just take them off the mat with the tape. After the numbers were glued down I stickled them as the color was just too much of a contrast and I couldn't quiet get the burnt orange match I wanted without the stickles.
As you can see from above I was running out of steam so I got into the leftover valentine candy and had some sweethearts... I needed to rest as this is still my hectic Monday and I needed to finish as I knew my week would be extremely busy, and this would be the last post for February. Didn't the letters turn out good? This is it after completing.
Now it was time for my little lamb from the Easter cart. I took the white portion and embossed the him with the swirl folder. Then I adhered that to the black and he had little feet and eyes and ears.....
Put on his little pink face and stickled all the swirls... he looks so handsome now.
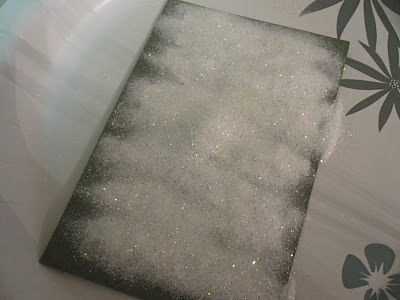
I was going to use the word March that I cut but loved how it looked with the letters removed so I got out the packing tape and placed it face up on the counter and set the image on the tape. I took my left over glitter from the snow on my Skating With Willie page and sprinkled it on the image and of course it adhered to the tape and looked wonderful. I must add that it was a little too thin looking when I laid it on my page. I could see some of the plaid coming through so I backed it with white scrap paper.
Then I stated my favorite part of this calendar.... the lion ROAR.... now he is really handsome! I cut in two colors and then cut away the mane. Embossed with the swirl folder on my Cuttlebug and added stickles.
I removed the eves and nose and made sure the ears and jowl would lift a little. Then I took a scap piece of black paper and placed it behind the face.
I flipped it over and then added glue dots all around the top of the mane from the body section as shown.
The yarn was slow to put on becasue you want to make sure they are even and that they adhere all the way. After completing I used chalk to finish off his fact and even chalked his body a little to add a little color and dimension. Guess I need to spend more time looking at Nanne's layouts on Nanne's Creations as she is an artist with that chalk on her work!
Then I placed the embossed mane over the yarn adhering it securely with Zip Dry glue. Now he is handsome, isn't he?
I then took all my completed components and placed them on the calendar...
Before and after framing...
Thank you for being with me today, I hope you like my little project and that it may have given you an idea that you can use in the future.
MyFreeCopyright.com Registered & Protected
I love hearing from you and am encouraged by your comments.
signature

February 22, 2010

Birds At Birmingham Zoo


This is my version of this weeks Stuck On U Sketch from Liz Qualman. It is a photo of me and my daughter-in-laws mother Utta while she was visiting here from Germany. We had a great time at the zoo with the children. When I looked at this photo of myself it was a wonderful reminder of why I need to stay on my diet!
I just love Liz's sketchs and everytime she does one for the SOUS ladies, I have to jump in and create! I hope you too enjoy Liz and every lady over at SOUS as much as I do! You just have to love my paper.... once again from DCWV, the Animal Crackers stack! Perfect for this page...
Below you will see how I laid it out on My Gypsy Woman after I made a few adjusments... as the birds on the base paper meant that I had to pull in my design. Originally I was going to have a bird cage on the left but this paper was too perfect to pass up. As it is, I altered even more when I started putting together the page.
After cutting I started by making my flowers first.
Starting with just glue dots in the center I quickly moved on to the Zip Dry as it was so easy with adding the buttons.
I then spritzed them with water to soften enough to curl the edges up a little more...
Then it was time to start working on the little bird...
I got out the chalk and added a lot more color... I colored his little legs and beak with orange and made his body a little darker so I could place a journal box under him with leftover scraps. I color his wing but didn't like how the yellow looked so I added feathers to the wing and tail. Now doesn't he look handsome?
I then had to work on placement of all my pieces in the midst of chaos... meet Steve, he was busy cleaning our carpets....

As you can see my house was really tore up so I spent my time in the kitchen working on the counter with my coffee table right behind me! I was just busy making a bigger mess!
I know I have the perfect letters for the title of this page and I picked these up for only $1 at Archivers a couple of years ago.
I got the right placement, used my handy tape, added glue and we are good to go!

Well I hope you like my little version of Liz's sketch... sorry about all the extra house photos but it has been an interesting morning. I have had my carpets cleaned, my annual termite inspection and even the had the furniture inspected by Lazyboy as I am not to happy with my loveseat.... so hopefully that will be fixed soon. I even ran the dishwasher, made the beds and of course I had to pull all the dining room chairs out be before Steven at Southern Carpet Cleaning arrived! (anyone in this area - he is the best just call me & I'll give you his number). I can't wait for things to dry so I can move about the house.... to see what else I can get into!
MyFreeCopyright.com Registered & Protected
Thank you for spending a few minutes of your day with me. I just love hearing from you! Your comments are such an encouragement!
signature