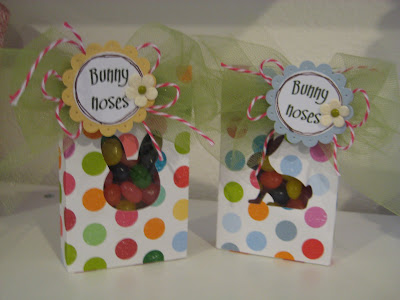
I used my trusty Gypsy and the Love Struck cartridge for the heart boxes and sized them at 6" each. Then I used the hide contour button to hide the hearts. Next, I placed a bunny head from Doodlecharms, and a rabbit from Celebrate with a Flourish over the hidden hearts. The bunny head was sized at 1.71" and the rabbit at 1.98".
I choose some "spring like" paper (from Me & My Big Ideas) and pushed cut. *FYI, I found that when I welded the rabbits onto the boxes, the Cricut didn't cut the score marks for some reason.
I just rolled with it, and scored where I needed to fold.
Before you glued the cute little box together you want to put something over the bunnies so that the jelly beans I mean Bunny noses don't fall out! I use pieces of packaging that I have in my stash. This piece was from a set of Halloween pins.
Just cut a square a little bigger then needed and add adhesive to the edges.Now it's time to glue the little box together.
Once I scored and glued the boxes together I filled them with
I used MS Word to make the tags, changed the font color to brown, and then printed onto white card stock.
Next, I used my faithful SU punches to punch out the saying, and a scalloped circle from card stock to add to the tag. (Yes, I first printed the saying in green, but then decided that I liked them in brown better).
In order to add a little something to the tags I decided to pierce each of the scallops. (The foam piece that I am piercing on top of is from a set of brads that I bought ages ago. It works perfectly for piercing!)
I also used a brown marker to doodle around the saying and then glued the pieces together.
I tied green tulle around the boxes and tied a knot.
Then, I folded the tulle over itself, tied some twine around it (to make it into a bow), added some more twine loops, and then added the final knot.
I also added a tiny Prima flower with a brad and attached the tag with a 3D glue dot.
I have to admit that I had a hard time not eating all of the "Bunny noses!" I almost had to take a picture of empty boxes! :) A big thanks to the hubbie for running out and picking up some more!Thanks for stopping by! I hope you all have an amazing Easter and get to spend time with the ones you love! <3 Kristy


10 comments:
Absolutely adorable. TFS
http://iwycd.blogspot.com/
This is so sweet!!! Love the "noses"!!
This is such a WONDERFUL project and just in time for Easter! Love those little bunny noses! Thank you for your wonderful tutorial, I am sure many will be making this to give their guests. Thank you for sharing this wonderful project with us today.
Note: when you weld on an item that has score marks your score marks will always disappear.
These boxes are so cute...love the tulle and the twine. Bunny noses don't last long at my house either! :-)
~Sharon C.
This is great!!!!
greengirl
Wow I love these little gift bags...gorgeous colors and ever so sweet bunnies!!! Thanks for sharing such a gorgeous project!
hugs,
M
Love the boxes and the "bunny noses" are adorable! Thanks so much for the detailed tutorial, what a great help! TFS!
lovelyinspiredcreations.blogspot.com
Super cute project .. one of the cutest Easter ideas I've seen this year!
Kristy, I love this project! Bunny noses are too cute. :)Tammy
Wow, soooo adorable!
Post a Comment