Hi, all! This is Jeannie from Nonnas' Scraps and it is so nice to be with you today! Thanks, Sheila, for allowing me the guest spot once again.
Don't you think this summer has spend past? I have two short weeks of vacation left. And, I will be getting a few "Welcome Back" gifts for my grandson's teachers finished. Join me in this project.
I know of very few teachers who don't enjoy a gift card. And this holder will make the grade!
Please note: this project was completed on the Zing with MTC software. It can, however, be accomplished using a Gypsy or CCR.
Cardstock:
Brown 6 x 12"
Black 6 x 6"
red 3 x 3"
green 2 x 2"
Font: LDT Teacher from Lettering Delights
Shapes used: rounded corner square, from from square and apple
White pen (I used Inkssentials)
Chomas Adustable Pen holder
Wood Grain embossing folder
Distress Ink: Antique Photo
Tape runner 1/4" wide
Pop dots
A gift card to insert in the back
First, I created the file in MTC.
I Selected the rounded square from Basic Shapes. I then, sized it to 3.5"
and duplicated for a total of 3.
To create the the frame I started with one of the squares and generated an inset shadow:
I accepted my imaged.
To finish the "frame" I then joined the two together:
I opened the Font, LDT Teacher and typed the message.
"Java great year!"
I then, opened an apple file that I had in my "stash" and sized it to 2".
I arranged all of my cuts on a 12" mat. I have the cuts assigned to different layers in the software...
you'll see that in a second! (BTW, the writing will be on the solid square in the upper right hand corner.
This looks funny now,
but that is because I will use the arrangement so I can cut with scraps of papers.
And this is how the screen translates to my actual mat:
On to cutting! Or, rather the writing...
I loaded the white pen in the Amy Chomas holder.
(For more information on using this pen holder in your Zing click here.)
From the software, I selected only the layer with the writing.
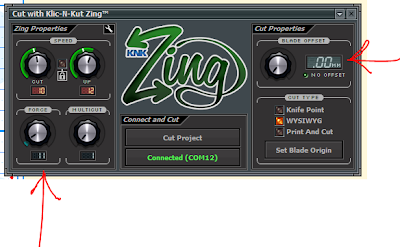
I set the software as shown:
Force 10-11
Offset: 0
WYSIWYG
I chose: Set Blade Origin
The laser light illuminates and it can be seen reflecting off of the paper.
Using the arrows, I moved it until I could see it approximately 1/8" from the upper and
right edges of the paper.
I then told the software that I was finished. Within seconds,
the white writing was on the black cardstock.
I did not remove the mat from the machine at this point.
Instead I changed the pen holder for the Red blade holder (and red blade).
I returned to my software and reversed the layers selection:
Onto cutting!
Force: 83
Cut one time
Offset: 0.35
WYSIWYG
When asked to set the origin, I chose "use last"
The cutting was so smooth!
To assemble:
Ink all parts
Emboss the frame with the wood grain folder.
Assemble the front of the holder first, in this order:
black board with writing
Brown frame
Apple
I ran 1/4" tape around the edge of 3 sides
of the solid brown backing.
I positioned the edge without tape at the top.
Finally, I pop dotted the apple to the front and inserted a gift card.
Such a warm greeting for any returning teacher, don't you agree?
Thanks for stopping by...


7 comments:
WOW - fabulous. And until today I had never heard of the Zing - thankyou:-) TFS
Very cute project, so detailed. I've never heard of the Zing either, looks great.
Awesome project and so perfect to show now right before schools starts. I am not familiar with the Zing but it looks very interesting. Thanks for the great photo tutorial and this great project.
Well, again, I've never heard of the Zing either but it definitely looks like something I'd love to play with. Love your project too, it's so cute and a perfect back-to-school project!
Super Cute!!!
Migdalia
My grandson will be starting his first year of school. This is such a neat idea. I'll have to make one for him to give to his new teacher. Thank you for sharing such a cute project and for taking the time to make such a nice tutorial.
Super cute! I'm getting that Zing figured out!!
Post a Comment