


 I started with an 8.5 x 5.5 piece of paper on my Imagine mat. I placed in on the top left hand corner of the mat. I took the picture correctly, but when I downloaded the image from my camera, it got rotated so the top of the mat is on the left of the pic.
I selected the image I wanted to print, sized to 3" high and then pressed next on my imagine.
 I set my page size to 5.5 wide and 8.5 tall.
 Here is what is looks like so far. Since you can't manipulate the images on the Imagine mat like you can the Gypsy, Expression, etc. I had to get my image down to the bottom of the paper and in the middle. When CCR(Cricut Craft Room) is finalized, you should be able to manipulate the images on the imagine mat, just like you can the Expression.
 Pressing the back key I added plain squares from the standard images that come with the imagine. the first square I sized to 3x3, and then I added 7 more squares sized to .5" tall. I did not color these images, and these squares were added in front of the damask decor image I already added to my Q. The above pic is what it looks like when I was done. The image is right about where I want it.
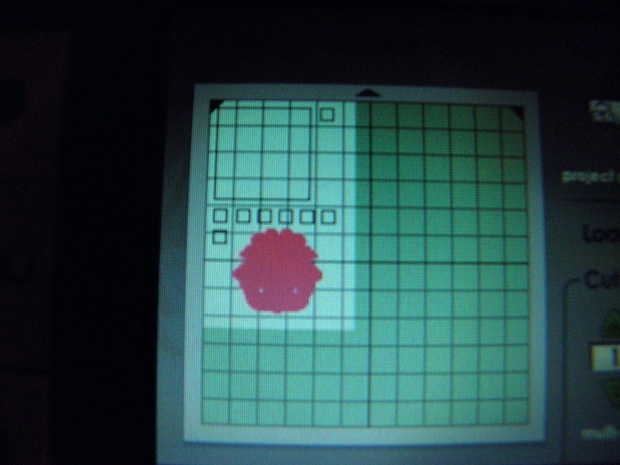 I then selected my damask decor image and chose a color to flood fill it. The sqaures I left colorless. The Imagine will ignore these and just print the Damask Decor Image.
 before you hit next after you have everything the way you want it, you need to select settings and chose print only, so the imagine will print but not cut.
 Here is what it looked like after I printed it. The top of the card is to the left.
 I trimmed one of the prints to be approx 4.25x5.25, punched the edges, added some bling, and adhered it to a clear plastic note card box I ordered off of Papertrey ink.
  Here is a sample of my finished note cards, they are 5.5 wide by 4.25 tall. I punched the corners, added bling and ribbon.

 I put them all in the clear box. Wouldn't these make a great gift for someone? You can write or stamp any sentiment you want in them.
If you look through you carts, I bet you could find all kinds of images to use on these cards. Who needs fancy stamps(even though I just love fancy stamps), when you have your Imagine.
Thanks Sheila for having me today on your blog. I really have fun trying to come up with projects.
Until next time, Beth.


11 comments:
Beth,
What a fun idea, thanks so much for sharing how you did it. I will definatly be giving this a try
Hugs
Stacy
What a great idea and I am thankful that you are sharing Imagine tips as I don't have one and don't have a clue how to work one. I am sure we have many followers that will be thrilled that you shared this with us today. Thanks Beth!
SUPER GREAT TUTORIAL!!! I saw the other link too and can't wait to try this.
Your right Sassylady I'm new to the Imagine and I LOVE being able to get all the creative ideas I can!!! THANKS for SHARING!!!!
Oh my goodness!! This is an awesome tutorial!! I will be trying this now that I know how!! Your cards are just beautiful!! Thanks for sharing this!!
Thanks for the great tute as I am still trying to learn how work my Imagine! TFS
Sue
Beth, your card is beautiful and your tutorial is GREAT and much needed!!! I've been trying desperately how to do something like this on my Imagine -- was so disappointed I couldn't manipulate the images. Thank you, I've definitely got to try this -- all the possibilities!!!
Oh your cards are just beautiful.. I remember when Linda showed how to do this.. but I have yet to try it... thanks for reminding me how to do it...
Wow! Thank you for explaining this technique - I love how the cards turned out!
Thank you so much for this tutorial. You made this technique seem so simple, and I intend to try it very soon. Looking forward to more, especially Imagine tips.
Karen
I will have to try this!! TFS.
like the card idea and all the relevant info you have shared..thanks for sharing it.plastic card printing.
Post a Comment