This is Gaby and am thrilled to have remembered that the 15th is the third Thursday in December and not the second.... long story.... Sheila knows... :) -- On to my project!
There are several tutorials on how to make a honeycomb out of paper in the WWW. Actually, I knew the basics of making a honeycomb such as pretending there is a clock face and place glue at 3, 6, 9 and 12 when creating a honeycomb circle (or similar such as a pumpkin, apple, etc.). Next layer you place glue at 1:30, 4:30, 7:30 and 10:30. Following layer, you go back to 3, 6. 9 and 12....alternating until you are done. You usually use/cut 18 pieces when creating a ball or half of that when you want to create a honeycomb design inside a card that does not have to go all the way around. And the most common paper to use is tissue paper. But for my project today I was inspired by Becca Feeken over at Splitcoaststampers. Becca created a honeycomb ornament using a Spellbinders die and I, my Cricut E2.
Step One - Cut 18 of the same design. Since the paper was thin, I selected the thin paper option, but it suggested I set my blade to 5. I chose to set my blade at 4 and it worked perfectly!
Step Two -
Fold the 18 pieces in half.
I used the thinnest paper I had.
I could not find text paper or
thinner paper at my local
craft store and was a bit hesitant to
cut text/book paper on my E2.
The thinner the
paper, the better results
you will get.
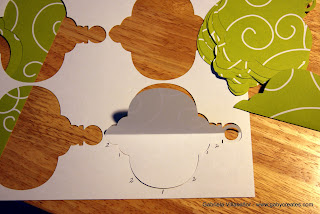
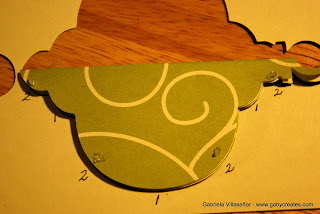
Step Three - Use one of the negative spaces to mark ones and twos, alternating the numbers. This will be your template so that you don't forget/get lost placing the adhesive. How did I decide where each number was placed? This is almost identical to Becca's but she did not explain the logic. Mine is that at each curb I had to have one of each, so I started with my biggest curb on the design and marked a one.... from there I just alternated the one and two.
Closer look at the numbers.
Step Four - Adhere strong adhesive at each point (you can start with the ones or the twos, I started with the ones such as Becca).
The picture is kind of dark but it was the best way to show the dubs of adhesive.
Step Five - Add adhesive to the number twos.... alternating on all 18 pieces....
Step Six - After you have your "sandwich" or all adhered together, you will have two green sides like mine (or the color of your paper). At this point if you are going to add a piece of trim, ribbon or? in the middle of your ornament, you need this step, otherwise you can skip.
You can see the ribbon sticking out at the top.
Last step is to embellished as desired.
I almost cut the upper part of the design because I did not think I needed it, but am glad I left it alone. I like how that extra top part looks in the ornament.
I just added a bow and some sugared berries.
Thanks for visiting and leaving a comment! ~ GABY


23 comments:
Oh, my goodness! What a beautiful ornament! Thank you so much for the detailed instructions. I really appreciate all the hard work that went into this tutorial! Thanks again for sharing such a wonderful project!
Carolyn
http://cccscraproom.blogspot.com
Wow - Wow - Wow, what a GORGEOUS ornament! It looks so delicate too. Thanks for the detailed instructions as I am sure a lot of people are going to what to make this awesome ornament. Thank you for sharing with us today.
Awesome! Going to use this idea for sure!!!
Holly
ribbonsandglue.blogspot.com
This is just a fabulous idea. I have got to gie it a try!!
Oh I absolutely love this! I am going to have to try it. Thanks so much for sharing!
What a beautiful ornamet. Thanks for sharing how you did this as I have to give this a try.
This ornament is as pretty as can be. I just love the way it looks. TFS
This i sjust BEAUTIFUL Gaby!!!!!!!1
and what a Great tutorial, I can't wait to try this, I make ornaments for family and friends every year, (about 30 of them) and I think this may be my ornament next year.....
TFS!!!!!!
This is mega cute and I am featuring this post and your blog tomorrow as part of my Fab Five Friday!
I will also feature Gaby's blog.
Happy Holidays!
Linda
wow! this is really pretty! I was just on the circle boards and saw your post to enter to win some carts! thanks for the chance!!
I just left another post but I didn't follow first...so I am reposting. such a pretty ornament. I was just on the circle boards and saw your post to comment to win a cart! thanks for the chance
OMGorgeous!!! I love your ornament Gaby!!! The green and white paper looks great to me! Thanks for the step by step!
Your ornament is so pretty. I'll have to try to make some for next year (too late for this year -- no time). TFS!
OH MY!!! That is GORGEOUSLY BEAUTIFUL!!!!TFS
Awesome tutorial and beautiful ornament!! It looks gorgeous on that hanger!!
Fabulous tutorial Gaby, you did a great job on the ornament, Love it !!!
hugs
Adele
Better late than never, I suppose. I just found this blog today and I am so impressed with the the beautiful projects. I will be checking it often. Thanks
Oh Wow! I've seen the 3D ornament dies from Sizzix buy you've got them beat by miles!
Pamela Palm
Beautiful ornament and great tutorial. Thank you so much!
Absolutely gorgeous ornament!! Thanks for the awesome tutorial Gaby!
Kimberly
wow this is soooo amazing!!! love love love this!!
hugs
Brenda
Absolutely BEAUTIFUL!!! I love this and will have to give it a try sometime :-)
Gorgeous ornament.. Thanks for the instructions.
Nana to 6
Post a Comment