As I was pondering on what to share today, several ideas came to mind such as sharing current and very popular trends in Scrap-booking and Card-making like "chevrons", "dove tail banners", or the color of the year "Tangerine Tango" ... I settled for a bit of most above mentioned trends and sharing how to make your own embellishment using remnants or newly cut out ribbon and twine.
After I had tried this technique successfully with twine, I came across Nichol Magouirk's blog were she had tried it with ribbon using a Sizzix die. So I set out to try the ribbon technique using a Spellbinders die. I must report I was successful and now I have to try using the deep cut blade on my cutting machine!
And here is the "How-to" create such an embellishment:
Step one: Decide on die shape and ribbon or twine to use.
Step two: Get a piece of cardstock or? a bit larger than your die (my die is a heart from Spellbinders but any metal die will do, i.e. such as Sizzix)
Step three: Trim a bit but not too much (you just don't want to waste too much adhesive or ribbon/twine.
Step four: Add strong adhesive to piece of trimmed cardstock.
Here a close up of the piece of cardstock completely covered with adhesive.
Below a picture of remnants or newly cut out ribbon
Step five: Start adhering your ribbon as desired.
Step Six: Place on cutting/embossing machine (I used a Big Shot by Sizzix).
This is how it comes out looking like after running it through back and forth 3 times.
Step Seven: Trim any left uncut areas (I could have run it through an additional couple of times, but I only had to trim a tiny bit in couple of places-the tiny polka dot ribbon was the stubborn one!).
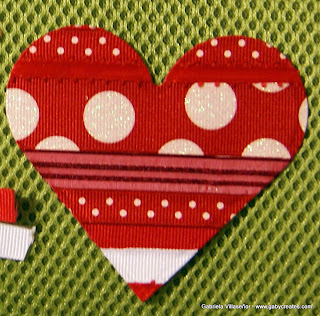
And here you have the end product or your personally made embellishment. Imagine the possibilities with oh so many shapes and colors!
Here is a picture of a heart using the same technique, but with twine!
(I created this around two weeks ago, but will not post/share project until Monday).
The twine is a bit more tedious to work with than the ribbon because it is thin string - you have to have more patience with it.
The twine is a bit more tedious to work with than the ribbon because it is thin string - you have to have more patience with it.
And here is a simple but cute (if I might say so!) card that I created using the ribbon heart!
And here a tiny tutorial on how to create your own dove tail banners (which to me resemble chevrons!)
1-Decide on the width of your banner
2-Make a cut in the middle of your paper from bottom up a) you have the choice of making it as high as you want, the higher the longer your tails; b) Either measure the center of your paper or "guesstimate" (love this made up word!)
3-Make a cut from one bottom corner to the center/or top of your previous cut (diagonally)
4-Repeat on other side
As for the color of the year "Tangerine Tango", here is a sample (I don't have any on my craft room) and I am glad to report that they [Pantone] are coordinating it with green!!...and other colors of course.
Thank you so much for stopping by and I do appreciate your comments!


20 comments:
This is a such a fabulous tip, Gaby! Thanks so much for sharing it.
Fabulous technique! I love how that heart looks!
Oh I love this idea with the ribbon and twine! Never would have thought to do this and the results are spectacular! Thanks for sharing!! Love the tangerine color too. lol
Fabulous technique and card! TFS!
Love it Gaby, thanks for sharing.
Gaby this is a wonderful idea! Love both the ribbon and the twine! Gorgeous for Valentine's Day or with any nestable - thanks for the tip!
Hugs,
M
I would love to give this a try! This is neat! TFS~
Gaby I just love this using with ribbon and twine with a nestable. It is soooooo beautiful and unusual I just love it. And what a great Valentine's Day card. Thanks for sharing this tutorial with us today.
Love this unique way to make your own "paper" with ribbon and twine. A different look for TFS
Barb from Toronto, Canada
Love love love this card! It is simply gorgeous!!!!
Absolutely Amazing!Thanks for sharing.
Love this idea, Gaby! Thanks for sharing!
Kimberly
My Craft Spot
This is so cool...thanks so much for sharing this...Now I need to make one. :)
hugs,jen
oh, I am so trying this technique! Thanks!
Oh my goodness! This is just too fabulous. Can't wait to try it. Thanks for a wonderful tutorial.
Hugs,
Larelyn
Oh I just love this Gaby!!!!
I can't wait to try this!!!!!!
TFS!!!!
I love this technique and the card is adorable, thanks Gaby.
Thanks for the tutorial.
Holy Cow! I would have never in a million years thought to use a die this way! Wow! Fantastic tutorial!!!
Gaby,
You are soooo clever!!! :) I can't wait to try this ribbon/die technique! What a beautiful Valentine!!!!!!!
Thanks so much for sharing,
Jennifer
partridgelu at yahoo dot com
Post a Comment