


I have to warn you, this is a picture heavy post but the end result (I think is fab).
Today, I have a Christmas card to share with you and I am going to show you how to make the Christmas tree that is on the card.

So, are you ready for this? Everybody say "Yes!"
You will need to start by picking a lovely designer paper (wouldn't advise card stock, although you could try) and you need to cut 10, 1.5" squares. Your finished tree (without the trunk and pot), using 1.5" squares will be 3" tall. Make sure your measurements are accurate, as it will effect the fold. Make sure all your folds are nice and crisp.

To show you the fold I have used a 4" square piece, just to get a clearer picture. Then I have used 2" square pieces to make up the example. (Using 2" squares you finished tree will be 4.25" tall.) You could ink the edges of your squares too!
For the first folding, fold in half, open turn and fold in half again so that you square looks like this.

Flip over your square (to the wrong side) and then fold on the diagonal, turn, open and fold on the diagonal again.

Now your square should look like this.

You will see that the edges are already starting to lean in towards the centre. Take the left and right sides and push them into the centre, so it looks like this.

Now you should have a triangle like this.

Next take one of the flapped triangles as below.

And you are going to squish it so that it forms a kite shape, and flatten. See the next two photos.

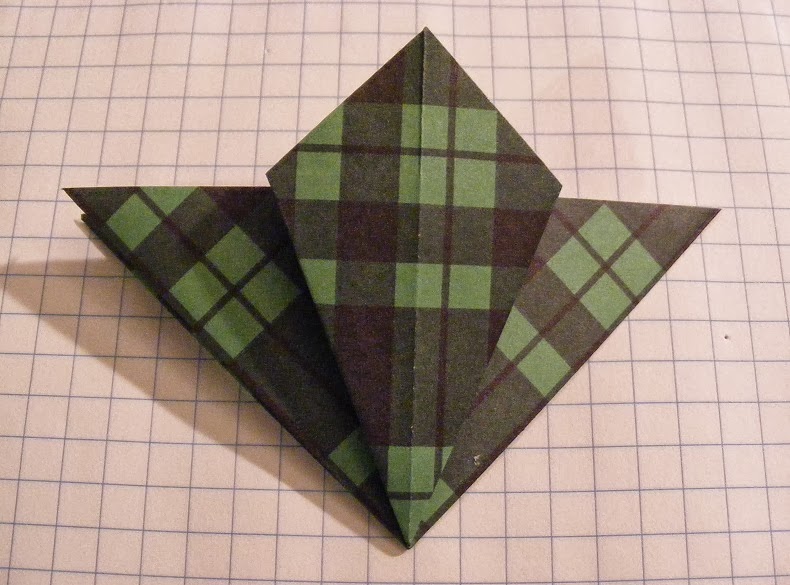
Flip over and do the same again.


This is your finished piece.

Make up all ten. I have used two different colours so that you can see how they go together.

Take two pieces, insert the top point of one piece into the front kite shape of another. Do this until it will go no further.

Tape the back of the two pieces together and continue taping as you add each row. Here is the back of the first two.

For the third row, you will add another two pieces by tucking them in the side flaps of that second row.

Next take another one piece for the fourth row, tuck it under the base of the green kite (just a little) but under the right and left kites, as below. Tape on the back to hold them in place.

Add another two for the fifth row as before (third row).

We are onto the final row. Add another piece in the centre as for row four, keeping it under the two kites.

To finish off, we are going to add two more pieces to this row, by tucking them under left and right side flaps. Don't forget to be taping as you go along.

Here is the back of the tree, all taped to secure.

Add a trunk, tree pot and a star, and add it to your card. I hope that these directions are clear - I found all the folding quite therapeutic :-)

Hope you made it to the end of the post and that you will give this a go.

Thanks for stopping by today.
Happy crafting.


4 comments:
Oh my goodness this is just too cute! I love this card and the dimensions of it. Thanks for the great tutorial and sharing with us today!
You might have just outdone yourself with this tree, Karon. It's a work of art. TY for the incredible tutorial.
Thanks peeps - can't wait to see you give it a go :-)
Such a cute idea. Yes, paper folding is therapeutic. Thanks for the great example.
Post a Comment