November 30, 2010

GabyCreates Ornament using Gypsy

My name is Gabriela VillaseƱor or Gaby from GabyCreates.com
I am delighted for the opportunity to guest design for She’s A Sassy Lady.
I created this ornament using my Gypsy in an attempt to save money.   I saw these ornaments in a K&Company ornament package and I though I could recreated using my Gypsy.

You will need a Gypsy to weld the shapes found on the following cartridges: George and Basic Shapes for the rectangle (I later discovered that Gypsy Wanderings does have rectangles), Gypsy Wanderings for the circle like shape and Independence Day for the oval (street sign) shape like.


Tutorial: Gypsy
1- place a rectangle 3.75" h x 12.11" w using George and Basic Shapes
     on mat lined up at the edge (it will be outside of the E's mat cutting area, but that is what you want)
     make sure you un-click the Width/Height chain so that you can manipulate.
2- place somewhere else on the mat 9 of the #23 (on key pad) signs found on the Independence Day Cartridge at 1.5" h


    a) you can see that they are aligned on the Y axis
    b) click group
    c) under advanced tab click Kern and enter -0.05
    d) click weld
now you have them as a group
3- duplicate group by clicking the mirror button
4- flip design by clicking on the flip (up and down)


Above you can see copied or mirrored
Above you can see the design flipped
5- arrange your design my making sure the X axis match
    (I have them at -.56)
6- now weld the rectangle with the other design (strip of signs).

I hope I have not confused anybody yet?

To recap: 1-you need a rectangle 3.75h x 12.11w,
                2- the sign #23 9x from Independence Day grouped, -Kern -.05 and welded
                3- flipped and arranged on both sides lining up the center of the last signs at the ends of the rectangle.

On to the next step

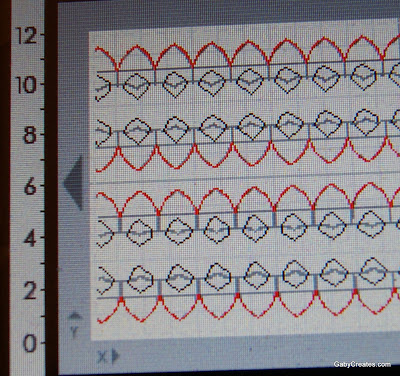
7- using Gypsy Wanderings click on the DĆ©cor Tag Creative Feature Key and choose design #44 on the keypad.

8- For this step I used this design by stretching it (making sure the Width/Height chain was un-clicked) to 1.02w x 1"h   ~    see below
I placed ~eyeballing one each on the center/middle of each sign at the bottom, I continued by placing another one of the designs on top making sure that the X axis matched this is important so that the design lines up.
If this is too difficult to follow and you wish to make this ornament, just emailed me at scrapabookaholic at hotmail dot com or visit me at GabyCreates.com and I will attempt to send you the Gypsy file.

On to the fun part:
I decided to place two on a mat and cut
You have to score at center (lengthwise)
Score on each intersection
Fold (zigzag)
This is the reason you want that extra piece at the end.
You just cut on one side and leave on the other so you can glue together.
I moved on the the other side.
I finished by placing some glue on the center front and back,
inking with walnut Ranger Distress in and embellishing/decorating with gold glitter glue and an already glittery snowflake.  But the embellishing options are endless!

I know that these ornaments will look beautiful hanging on a Christmas tree.
I am planning on making many more and taking to my sister's house (her turn to host Christmas).
Thank you Sheila for the opportunity to Guest Design at She’s A Sassy Lady!

November 29, 2010

Cricut Couple Snowflake Card

Jill and I are just thrilled to be ask to guest design for She's a Sassy Lady.  I just hope ya'll don't mind that this project was made by a DUDE!  Hee! Hee!  This was a really fun project and I sure hope you try it yourself.  It makes a really beautiful card, but also works fantastic for ornaments.
You will need a Gypsy to complete this card for the base shape.  I used When it's cold outside, Accent Essentials and Lacy Labels for the cuts in this card.
This card shape is from Accent Essentials.  The cut on the screen makes two cards.  Simply make the shapes a height of 5.20 and then over lap them in the center and weld them together.  This is the hinge for your card.  For this card, this was cut from a sage green card stock.
 On the left, this mat is cut from patterned paper at a height of 4.75 and the sentiment mat is cut from white card at a height of 4.29.
 This page is for the snowflake details.  This entire page is cut from the snowflake patterned/glittered paper.
This page is also for the snowflake details and is cut from pearlized white card stock.  While your shapes are cutting, you can prepare your folding project!
Cut two strips of patterns paper.  Both strips are 3" x 12".  Punch down one side with your choice of border punch.  This one is from a Martha Stewart set for corners and borders.

Starting on the front, use your scoring board and score a line every half inch.  This is scored the entire length of the strip.
Then flip over the strip and score again, every half inch, but score this in the center of the other side's scored lines.  This will make it much easier for folding.
Fold your two strips using the score lines you created to make two long accordian strips as shown above.
Keeping the detail side facing inside, glue your ends together.  Use a good paper glue and then clip the ends to hold.  Make sure you allow this to dry well before continuing.
While the glue is drying, it's a good time to ink your project.  I used a chocolate ink for the card layers and an opaque white ink for the brown snowflake cutouts.
Once the glue had dried, simply spread out the snowflake side of the tube you created and bring the uncut side to the center.  This will form your snowflake circle background for your card.  Sit a can or something in the center to hold it down.
Using the cut from your card shape, stick with double sided tape on the outside front of your card.  Stick down your folded snowflake circle to the front of the card.
Then add your snowflake shapes.  Use 3D tape or zots if you want to make the layers pop, like this one.
You will see that I used stickles here and there to add some bling to the project.
On the inside, I used the same patterned paper that was used on the outside for a border.  Then made the white sentiment mat.  I also added a few small brown snowflakes to finish it off.
Again, this technique makes fantastic ornaments too.  It can be used in so many ways!
Thank you so much for Sheila for letting us play in her yard today and please feel free to stop by our blog at Cricut Couple and check out our other goodies!  Also, be sure to watch both of our blogs as we are teaming up with some amazing bloggers for the All That Glitters Blog Hop on December 11th!

November 28, 2010

All That Glitters Blog Hop


I'm so excited to announce a little surprise to all my followers and to those that are just stopping by.  A wonderful Blog Hop called Blogger Templateswill be happening starting on December 11th and will run to the 13th.  We have a number of talented designers that are participating and we all can't wait to share our fun projects with you.  There will be a number of fun prizes along the way too.  Closer to the time of the hop I along with my fellow bloggers will be sharing more details about the hop and the prizes to be won.  For now, I will just share with you who will be showing off some pretty amazing and fun projects (but in no particular order).

MelissaMade - Melissa uses a number of techniques but my guess is that Copics are her favorite go to tool.  She's recently been recruited to work for five Designs Team  including here at She's A Sassy Lady.  Check out her blog for some inspiration!

CardDreams by Nana Donna - Donna is our newest blogging neighbor and let me tell you - her cards can make anyone's jaw drop.  Her talent is just amazing - she has techniques that she often shares too - so stop by and check out all the wonderful creations.

A Place For My Cards - Jeannie Phillips is an amazing artist - she has been featured so many times in The Chirp that I think I've lost count.  Her new adventure includes her very own store at Etsy where she sells handmade scarves and hats (maybe even some socks)!  They are GORGEOUS.  Of course her eye for color shows through in her knitting skills as well.

The Cricut Couple - Bobby and Jill are amazingly talented.  Did you see their entry for the Circle Blog monthly challenge?  Holy Smokes that creation belongs in a museum.  The Cricut Couple does fantastic things with paper - you won't be disappointed.

The Cricut Diaries - Summer and Jennifer will also be hopping - Their blog consists of the sweetest cards.  They know how to work that Cricut/Imagine, and the iRock for that matter.  Their styles are really different I think and you can tell the difference between Jennifer and Summer's creations - both equally beautiful.  You should stop by and see what they are up to with the Imagine!

Daily Grace Creations - Peggy and Donna are a mom and daughter team.  I love these gals - their closeness shows in each post with such inspiring work. I mean look at how sweet of a post this is.  So make sure to stop by and look at their amazing and inspiring cards.

Cardz TV - Mary is absolutely outstanding!  She runs two challenge blogs - Paper Cutz Challenge and Cricut Cardz Challenge.  Her own blog has awesome videos describing her card making and she offers several valuable tips for everyone!

Love, Laughter, and Creations - Sherri is a very talented card maker and can be found weekly hosting her very own challenge blog at Jitterbuggin'.  Each month she gives out a cartridge - so make sure to stop by and participate!

Mark your calendars for December 12-12-13 and get ready for a Great Blog Hop, you are in for a great treat when you see what these blogs have in store for you!

November 27, 2010

Gypsy Made Simple - Card Gift Box

What lovely gifts your hand made cards would make for your friends and relatives. This week we will learn to make a box to hold up to 6 A2 cards. Now I know you have all made a box before this one just mixes up the dimensions as it is not square. Don't worry about catching the exact sizes while watching the videos as I typed them up for you. My lid was just a little larger than I like so I typed it up just a tad smaller.
Now let's get to work. Turn your Gypsy on and grab a cup of coffee or tea and work along with me.
Here are the sizes to help you as you are making this little box with me. This way you won't have to stop and right them down. The top of the card is what I adjusted down from 6.30 in the video to 6.20.
Sizes: Base of card, bottom 4.95x6.00, sides 1.10x6.00, ends 1.10x4.95
         Top of card, bottom 5.20x6.20, sides .87x6.20, ends .87x5.20
         Make tabs to fit and frame your personal choice and size


Sizes: Base of card, bottom 4.95x6.00, sides 1.10x6.00, ends 1.10x4.95

         Top of card, bottom 5.20x6.20, sides .87x6.20, ends .87x5.20
         Make tabs to fit and frame your personal choice and size

Sizes: Base of card, bottom 4.95x6.00, sides 1.10x6.00, ends 1.10x4.95

          Top of card, bottom 5.20x6.20, sides .87x6.20, ends .87x5.20
          Make tabs to fit and frame your personal choice and size


Cricut is busy cutting. Don't you just love this paper from K and Company the Life's Journey stack? So yummy.
See how wonderful the colors coordinate.
With the little prima flowers to adorn the box it is sure to make a perfect little gift.
First I scored both the top and bottom and make a nice clean fold.
This is how it will come together. Notice my paper is even double sided.
I tested to make sure the cards would fit and there is plenty of room for 8 flat or 6 thick cards.
When doing the top, make sure you place your accetate on first on the inside. Then your frame should be glued on before folding the box together.
Don't you just love the size difference. You can easily see the coordinating paper while looking at the side of the box, giving it a more finished look.
Here is my prima held together with a Kand Company button brad. Don't you youst love the colors.
And here is the complete box filled with 6 A2 cards. The only problem is it looks so pretty I don't want to give it away!!!  How cute is that? And just as easy to make. Now I want to see yours. All you need to do after you make your little box is take a photo. It can be decorated or plain, your choice. Then either post on your blog or the Cricut Message Board. After you do that click on the McLinky below and follow the instructions. It will link you right to this site and we can all see your newly designed box.

I sure hope you liked today's project and have created one along with me. If you have any questions please send them to me at shesasassylady@hotmail.com. Also if you have any suggestions as to what I can do next email that to me too, as I am running out of ideas.
Thank you for your sweet words of encouragement. Your comments continue to inspire me.
signature

November 26, 2010

Making Ornaments With My Grandchildren

Well ladies this accidently posted a couple of weeks early, I haven't even typed in what I was going to say. Just shows you I make lots of mistakes. Please check out Cheryl's BEAUTIFUL post after this as I accidently posted on top of her.
Above you will find my beautiful grandchildren Justin on the left, Gavin and Sydney on your right. After Thanksgiving dinner was over we cleared the counter and laid some old garage towels out to prevent my counter being stained with paint and then turned the children loose.

Every year I get Ornament kits for them at Hobby Lobby and after dinner is done and before the desserts are served we make ornaments and the children just love getting ready to put their trees up during the holiday weekend. See even little 2 year old Gaving joins in. He was so serious, and wouldn't put down the brush till the other two had finished.
Justin started by making lines on his ornament and then used the various colors in between.
This is my counter that I always craft on and my daughter Jennifer joined in on the fun and painted Sydney's name on her ornaments.
I held the ornament for Gavin to paint and the paint was just flying!
Justin showing off a finished ornament.
Sydney working hard on one of hers.
Gaving finished covering his so he got to paint a wooden gingerbread man too.

Here are some of their finished ornaments. Gavin top left, Justin on the right.

Sydney on the left and Gavin on the right. We had so much fun and wanted to know what they could do next year!
Hope you enjoyed today's post. I know the children would love your encouragement and cherish your comments. Have a blessed day!
signature