


 Hi all,
It's Kelly from www.kamscraftyplace.blogspot.com. I would like to say thank you to Sheila for having me back again. Now, if you remember last time I said I would share with you a flower necklace if it worked. Well it worked I'm pleased to tell you. Here are the steps on what I did.
 First I got out my Cuttlebug and my Tim Holtz Tattered Roses Die. I love my Expression, but sometimes I don't want to wait for it to cut etc.
I used these papers Ella Blue. I love these papers and have been using them alot.

I used two B plates with this die as it's quite thick.

I used a paintbrush to curl the petals of the flower.
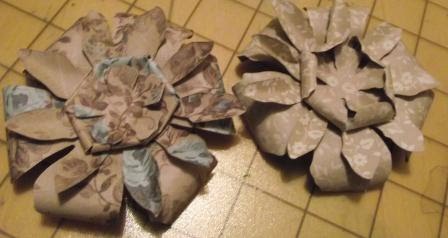
I then stuck the flowers together. As you can see I did do two, just in case the first one didn't work.

I then got out my melting pot. I had seen a tutorial on You Tube on Glass flowers and these are the steps I followed. First I put my UTEE in my melting pot.

I put the lid on as it helps it to melt faster.

Here is the UTEE. It's extra thick embossing powder. I used the clear, but it does come in lots of different colours.

These are the tools I used. I wiped the tools over my old versafine inkpad as this helps the embossing powder to slip off the tools.

Here is the powder beginning to dissolve.

I then placed my flower in the melting pot. I used my tweezers to turn the flower. I made sure it had all been covered.

Here is the flower once it's cooled down.

You will find that on the edges you'll find some little lumps. I just cut them off with my scissors. If you have any bubbles (luckily I didn't) you can heat them up with your embossing gun/tool and the embossing will melt and the bubble will melt away.

I then punched a hole through one of the petals with my crop a dile. This was a little bit tricky as the petals etc are now fairly rigid and I didn't want to snap the petal off.

I then used a eyelet. I know white isn't the best colour, but you don't see as the petal is curled over.

I then put a jump ring through the eyelet.

Here is the finished necklace once I threaded it onto one of my necklaces. I quite like it. It does mean I can make all different types of flowers and in lots of different sizes. My Gypsy flower file will be useful to make a few flowers also. I was pleasantly surprised that it was a lot easier than I thought it would be.
I hope you enjoyed this tutorial and will have a go at making your own jewellery.
Kelly


10 comments:
Kelly this is GORGEOUS! Love the flower necklace and the tutorial is just wonderful and so easy to follow. Thanks for sharing with us today.
Wow is this pretty. I would love to have a necklace like that. TFS
Sue
Pretty necklace and a great instructions. TFS
What a gorgeous flower. Love how you made this. :)
Very nice!!
What a beautiful necklace!! Love it!! With your awesome tutorial, I believe I could actually make one of these!! Thanks so much for sharing your talents with us!!
Wow - great tutorial!!! I love this - so beautiful!
Hugs,
M
Hey! this is SO cool! love the idea of making something wearable! now if we could only make paper shoes..LOL! great tute!!!!!
Leah
Wow ~ this is gorgeous!!!! Darn, now I NEED a melting pot!!
Thanks for the tutorial!
It is stunning!!! And I'm with you on the UTEE... I love that stuff!!!
You did a great job!
Post a Comment