Hey Ya'll,
It's the Sassy Dude here again from The Cricut Couple. For those of you who don't see our blog that often, it's been a challenging couple of months and during this time, my Gypsy had to go in for a tune up, so I had to get creative real quick to meet this deadline as I LOVE my Gypsy... So... This was a fun project to welcome Spring using the Cricut Imagine, Audrey Imagine Art Cartridge, Mother's Day Bouquet Cricut Seasonal Cartridge and Serenade Solutions Cricut Cartridge.
For this project, I started with a white 12" x 16" Canvas. To prepare the canvas, there are a couple of tools you will need to make it like this one, but you can paint the canvas or design it in anyway that you want for your background.
I used a set of clear stamps that have a flourish design, a large clear block and a VersaMark pad. I placed the clear stamps on the block in a random pattern and inked it with the VersaMark pad. The pictures didn't turn out showing this technique because the VersaMark is clear, but you simply stamp over the canvas in a random pattern. This builds your base for your inking. An extra tip is to use a large book under the canvas it it's already stretched over the wood so that you can get a good impression with your stamps.
I used a light blue ink with a makeup wedge sponge and rubbed it across the canvas first to mimic brush strokes. I then used a craft sponge and pounced the lime green and then the pink all over the canvas. You can see in the detail shot how it looks close up. The VersaMark collects more of the ink and makes the flourish design stand out, but it's still very mute and makes a very nice airy background. Since this is a pre-treated canvas, I let it dry overnight so that everything else would stick to it well.
For the next step, I used the Imagine with the Audrey Cartridge plugged in. I selected the scalloped circle from the built in designs on the Imagine machine and flood filled it with this yellow damask background. I printed and cut this on textured white card stock.
I centered the scalloped circle on the top of the canvas. I used tacky glue on the back to make sure that this stuck securely to the canvas. While this dried, I went back to the imagine for the rest of the cuts.
I used the Mother's Day Bouquet Cartridge with the Audrey Cartridge to make all of the flowers. I started with the larger ones picking random designs, filling them with random patterns from Audrey and just had fun picking lots of different things. They all coordinate so well that you really can't go wrong with it.
As I went along, the flowers became smaller. I started with 3.00 in height and worked my way down to 1.50 in height.
I then selected some leaves from this cartridge as well. I simply filled them with either green patterns from Audrey or used the greens in this cartridge's color scheme.
I used a basic white card stock without texture for the flowers. Once this had all finished, I used the Serenade Cartridge to cut the vase and butterflies.
The vase is cut at a height of 7.00 and the butterflies and all layers are cut at a height of 2.50 without using the shadow feature. All patterns were also filled from the Audrey cartridge.
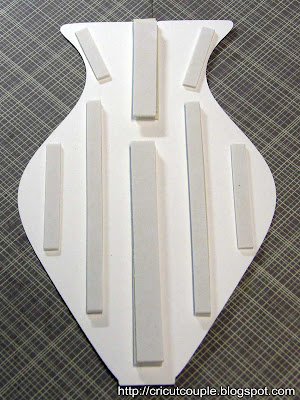
Hopefully you can see in this picture how I used the 3-D adhesive. I used 1/8" strips. I layered three in the center, two heading towards the outside and one on the ends. This way, when it's added to the canvas, it has a curve to it like a vase.
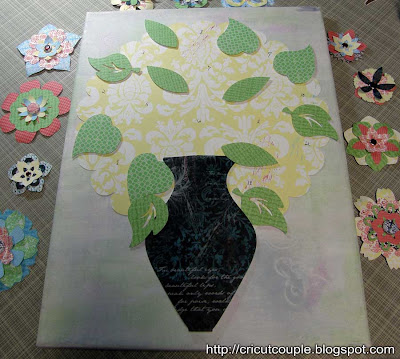
Once that's all done, simply peel and stick it to the canvas in the center bottom. You can see here that the yellow background gives a surround for the placement of the flowers.
You can see in this picture that I just put together random flower layers to create the blossoms. Each are put together with a brad. Some of the petals were curled around a pen to curve the petals. I made center brads with the I-Top and used gem brads for the centers of the smaller blossoms. I then placed them around on the canvas. It's hard to see in the picture, but I numbered the blossoms were I wanted them to be. I put a number on the canvas and on the back of the flowers. Then sat them aside and arranged my leaves and glued them down. Once I had half of the leaves where I wanted them, I started adding flowers. When all flowers were placed, I went back in and added leaves.
Once it was all put together, I added a ribbon bow the to top of the vase as it would be in a floral arrangement. I then added some stickles here and there to highlight the flowers.
It was such a long winter and this project really made it feel more like springtime! Thanks so much Sheila, for letting me design for you again. This was a real treat! We love to hear your comments and would really love for you to check out our blog at http://cricutcouple.blogspot.com/. Welcome Spring! Hope you all have a wonderful season! Most Sincerely, Bobby
March 31, 2011
Subscribe to:
Post Comments (Atom)


12 comments:
Bobby all I can say is AWESOME!!! This bouquet is GORGEOUS! All the detail and done on your Imagine it is just beautiful.
Thank you for your great tutorial as it will help others to make this also. And Thank You - Thank You for joining us here today!
This is so pretty! I like the colors and all the detail! TFS
Sue
Look how beautiful this is! I like all the beautiful flowers. TFS
OH my FABULOUS!!! Love all the gorgeous layers of flowers and leaves. Fantastic vase and starting background too!! So wonderful!
hugs,
M
Wow!!! This project is amazing and beautiful!!! So much wonderful detail!! I'm so excited because I have all of the cartridges that you used!! So glad I saw this today! Thanks for sharing you awesome talent!!
Absolutely stunning. Your projects never cease to amaze me. Thanks for all your inspiration.
What a beautiful arrangement/piece of art!! Great job!! I love love flowers!!!
Bobby this is awesome. I am so adding you into my list of men who can enter my scraproom!
Gorgeous!
OMG, this looks magnificent!!!
I am a newbe in crafting so my eyes almost poped out of my head when I saw this. OMG you are so talented I love it someday I will be like you :)
Can I say WOW!!! That is so beautiful!!
Post a Comment