


Welcome to She's A Sassy Lady
and to my first post as a Sassy Lady Designer
Today I want to share a couple of techniques I taught my daughter who is visiting and just arrived from Texas for the holidays.
1-How to use a Cuttlebug Die/Emboss combo plate to make a card.
2.How to use Cuttlebug dies and matching embossing folders with a die embossing machine.
3-How to make a glue dot bling.

First cut a 10"x7" piece of cardstock,

Score at the 5" mark (half) and at 5 1/4,
Fold at the 5 1/4" score line - you will end up with a 5"x7" card (and a little score mark on the back side. I don't mind it and it is not that noticeable)

And place on top part of the Cuttlebug die/emboss plate,


Run through die cutting/embossing machine (I used my Sizzix Big Shot)

We used vellum and die/embossed cut an additional 5"x7" piece to use on the inside. Additionally we cut a piece of 5"x7" festive pattern paper for the right side to cover the very minimal markings that you end up with after running through the die cut/emboss machine. Most people would not mind at all.
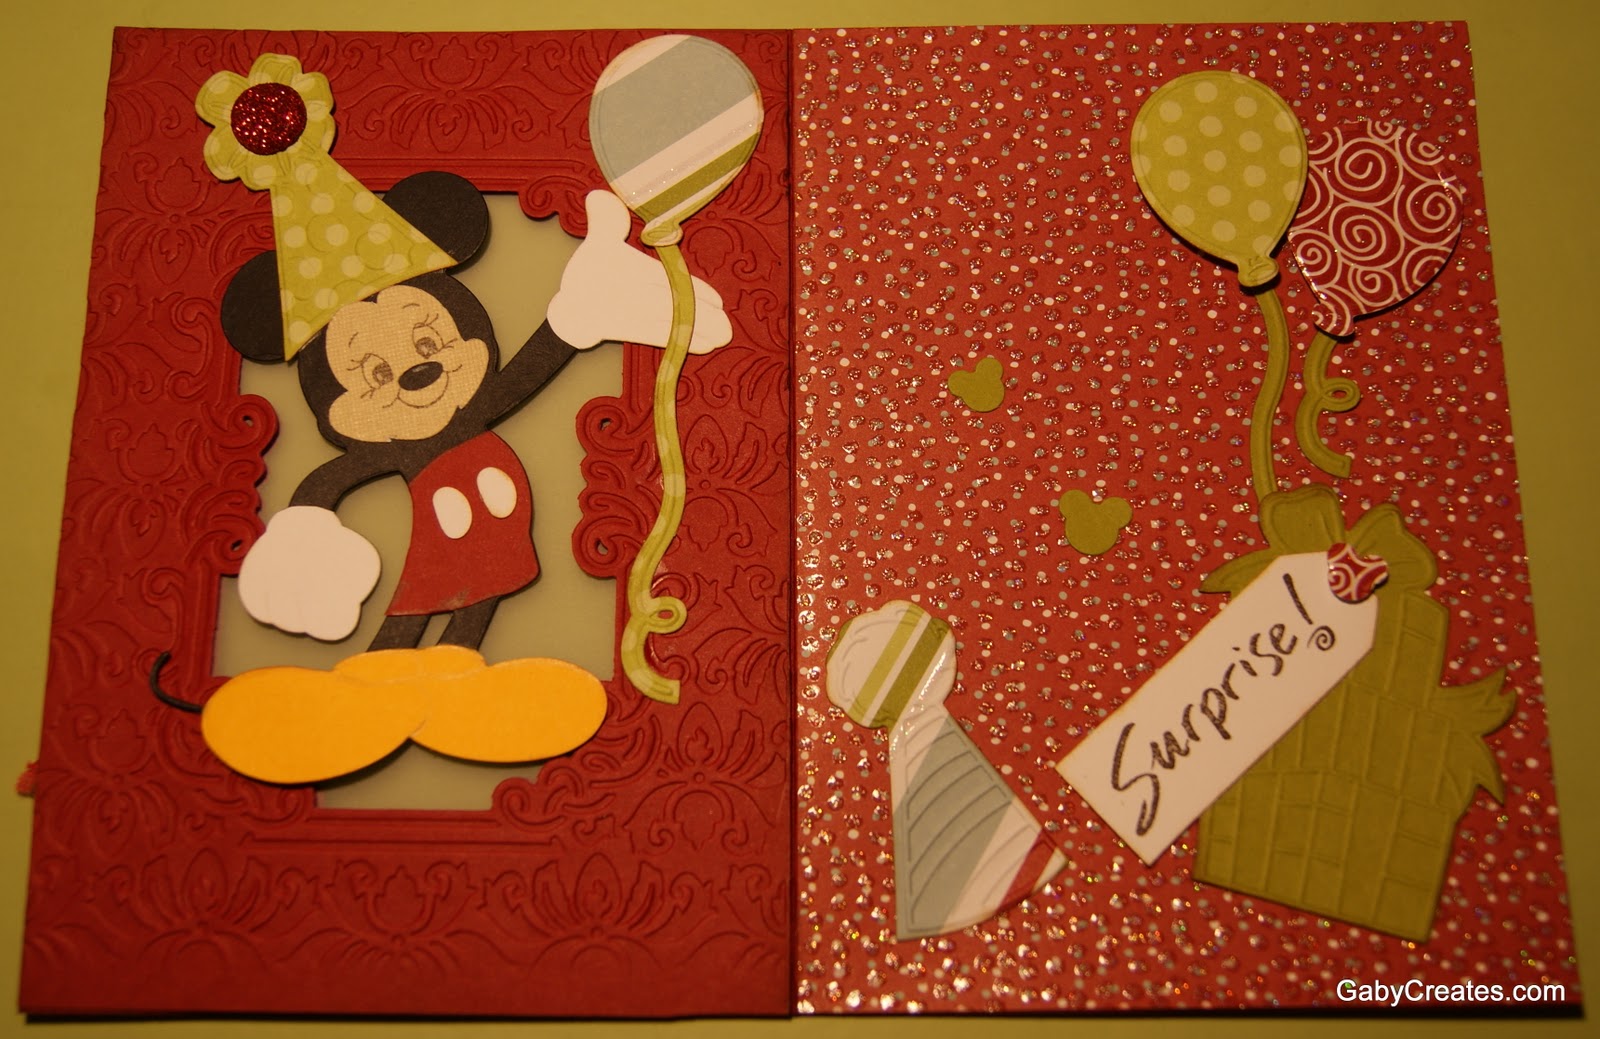
We die cut and embossed all the Mickey and accessories with the Cuttlebug Mickey and It's a Party set.
Since the Mickey die is just the silhouette, we cut Mickey once in black, yellow, white, red and hand cut the pieces with the exception of the face. For the face I used my Gypsy and the third try was the charm! Face cut using hide contour for mouth and eyes at 1.31" w x 3.70" h so that we could use a Peachy Keen face stamp.
We added a glittered glue dot to Mickey's party hat!


All we did (that is my daughter's finger) is dip a glue dot straight to the glitter container. You could pour some on a container and go from there, but I find this method to be the easiest. After dipping into glitter you press against a non-stick mat to make sure the glitter sticks good, and voila! you have a glittery embellishment!
Please leave a message if you enjoyed, and if you wish to see more pictures of the finished card, visit me at GabyCreates.com and Thanks for Visiting She's a Sassy Lady!!


10 comments:
I really love the tip about the glitter on the glue dot! That's awesome! and so easy!! Thanks for sharing it! Love your card!!!
What a great card and thanks for the glue dot to glitter tip, I never did that before. What a great way to bling things up. Thanks for sharing with us today.
Darling card! Who doesn't love Mickey?! I never thought about dipping glue dots in glitter but I will certainly use this little tip! Thanks for the idea!
Barb :)
So adorable Gaby!!! I love the vellum over the front and the glue dot trick is AWESOME!!! Thanks for sharing that wonderful tip!
Hugs
M
Wow!! This is such an awesome card!! You are very talented!! Thanks for all of the great tips!!
This is such a beautiful card. My grand daughter would love this as she collects everything Mickey. TFS
I had to come and see how Gaby created the card, it is just adorable and thanks for the tutorial and tips! I am your newest follower! Gladys, Gaby's loyal fan....
Just hoped over from Gabycreates to see tutorial, great blog!
Wonderful tute! Love your embossing folder/die.
Gaby,
Thank you so much for the detailed tutorial!!! :) I am going to have to look into those die/emboss combos. I also am sorry that I passed on that Mickey silhouette! You came up with a clever way to detail him up (cutting it out in different papers...)-quite clever! I learned so much from visiting. I plan to use the glue dots in glitter now.
Thank you so much for sharing your time & talent with us,
Jennifer
partridgelu at yahoo dot com
Post a Comment