Hi Everyone! This is Melissa from
MelissaMade. I'm really excited to share this project with you for my first time as a She's a Sassy Lady Guest Designer! I really want to thank Sheila for this opportunity! I thought this was an appropriate project since I'm showing you what I've learned in a few short months. The first photo is a layout I did for my daughter's bathroom shadow box. The second is it's replacement - after learning and practicing a number of new techniques. Here's the inspiration I used to make both - her shower curtain.
I had just gotten my Cricut and so I cut out images and put them down on a 12 x 12 piece of paper. My daughter loved it and I thought it was pretty good. I then opened a few blogs and a few message boards and couldn't believe all the amazing creations and techniques out there! I started experimenting and learning about texture, depth and dimension! Soon, I bought my Gypsy and a few more cartridges and here's what I've learned.
First, I pulled out my Gypsy and paper and laid out exactly what I wanted.
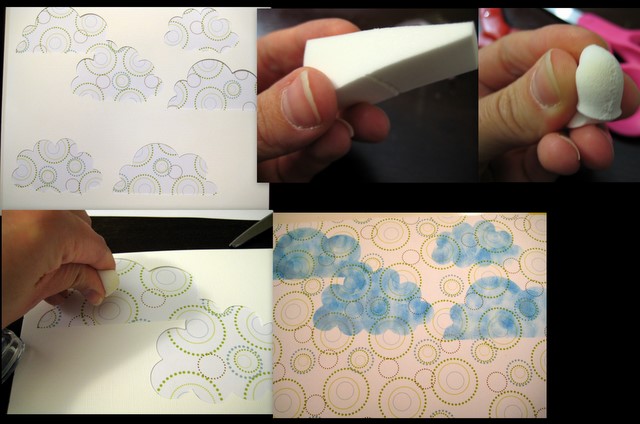
Next, I cut out my images and set them to the side. I took the left over sheets and used them for a stencil. I started with my background which will be sky and grass. I wanted to add a lot of depth in this project and creating a background with ink was a good option. I took the stencils from my cut-outs, ink and a make-up sponge and started creating. I laid the stencil down on the 12x12 sheet of designer paper. Rolling the make-up sponge took away the harsh edges that I didn't want to see. I then inked it up and started dabbing in the clouds with a soft blue. I then added a bit of moonlight white to soften the blue. I did the same for the grass but in a green.
Once I finished inking with the stencil I started adding some texture and dimension to a few of my objects. I ran my clouds upside down on my sticker maker. Then I used a putty knife and ran it over the clouds to adhere the glue better. I pulled them off and sprinkled glitter on them.
I love the texture and shine it adds to the clouds. Notice I also inked the edge of the clouds before adding the glitter which makes them stand out a bit better. Next, I started working on the water and adding a bit of interest to the top of the waves. I took my embossing ink and inked the top edges with the make-up sponge again. I added some embossing powder in a white and used my heat gun to fix it.
Then I began working with each individual cut-out. Layered, doodled, and inked then finished by adding some googly eyes.
To finish up my project I decided to add more depth and dimension. I used pop dots to have some images coming up off the page. (A quick hint about pop dots - they work much better when a bit cold. So if it's warm in your house - put them in the fridge for a bit and they won't be SO sticky until after adhered to your objects then they start to warm up and stick much better.) Each layer of the water is popped out from the one behind it. One of the clouds is popped and the frog has about three layers popped. I also bent the grass cuts forward a bit only adhering the bottom to the page. This gives a nice dimension to the layout and some added depth.
You can see a huge difference in the layout, yet the one with added depth and dimension really makes my project more impressive and more artistic.
Here is the final layout - it has more depth, texture and dimension and overall looks a bit more professional. The little touches really do go a long way in all your projects!
I hope you enjoyed my tutorial and project. Please check out my blog
MelissaMade for more fun!
Thank you for your sweet words of encouragement, your comments continue to inspire me.
Enjoy!
Melissa


11 comments:
WOW!!! Just look at this how BEAUTIFUL. Love the first project but the second takes it to AWESOME!!! What a difference, it is amazing how much we learrn from following these blogs, isn't it? Love the dimention in the second project and all the glitter and that little fish peeking out of the waves is too cute. I could go on and on, the sparkly clouds and grass and you have to love the little frog!!! Thanks for sharing with us today!
This is beautiful! It would look great in my bathroom too.
thanks for all the photos on your techniques. your projects are gorgeous as always: this comment includes the before and the after. Both are :)
Excellent job! Great redo! Love the theme and the colors used - don't you just love glitter? TFS!
jackie
WOW... they are both adorable, but I love the after... what a difference a few little things make.
Awesome page!
As a newbie, I find this post so inspirational. Your first shadow box is great, your second is sophisticated and out-of-this-world. I look forward to learning all of the techniques you allude to!
So adorable! Love all of the dimension!
Melissa, I love it! You did a fantastic job! I wish I could see it all in person!
Melissa, I love it, so much depth, your daughter must have loved it!!!!
TFS
Oh wow! this is excellent!! TFS
Post a Comment