


Hi all,
I'm a Kelly from http://www.kamscraftyplace.blogspot.com/. I'm Sheila's guest designer today. Thank you Shelia for having me back. This time I'm going to show you how to make your own paper rosettes. As some of you may know Tim Holtz has just brought a die out which makes a paper rosette. I have this die, it's great but you are limited by size. I thought I would put the task to my Gypsy and see what she could come up with.
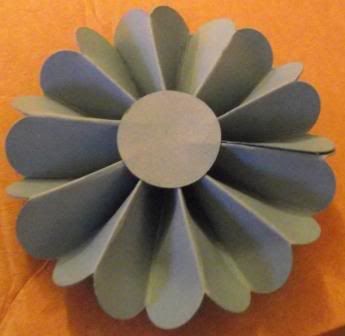
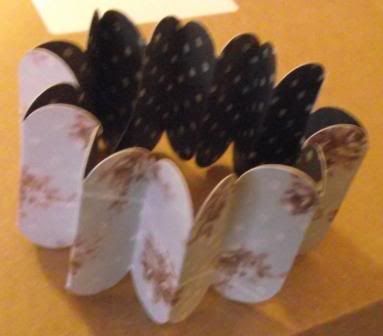
The blue Rosette is my first attempt. I thought it turned out quite well. Below are the steps on how to make it.
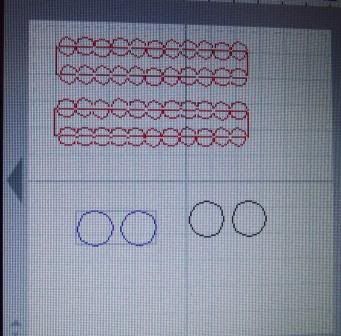 This is the Gypsy screen. I used Gypsy Font for the rectangle and the circles. The rectangle was 7.75 inches by 1 inch. The flowers were 1/2 inch. I could have gone smaller, but I know that sometimes the Gypsy can take a long time cutting something too delicate. The first time I cut this I had 3 strips of the rectangle and 6 circles. The Gypsy froze when it finished cutting. I turned it off and adjusted it to the above and it cut fine. I cut it once, blade 5, pressure high.
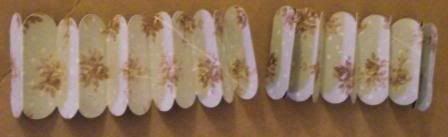
This is the strips cut out on the Expression. I used double sided card.
You then have to fold it alternately like an accordian or a fan.
Join the two ends on each strip to the other strip so it forms a cylinder. You then need to gather one end of the cylinder together whilst pushing the other end out. I couldn't photograph this bit as I couldn't hold it down and take a photo. You then stick the circles on both sides in the middle. Like the picture below. This holds the rosette in place.
I hope you like this tutorial. It was a lot of fun to make. i'm going to try different lengths and sizes of the circle to see what the Gypsy can cope with.
Just updated my blog so you can download the file for the rosette on my blog. It's under the heading Gypsy Files.
Kelly


10 comments:
Kelly, I love your Rosettes. Cool how you cut that from your Gypsy and then it is just a matter of folding. I have to try this as the flower is adorable.
I love this idea but could you let us have the cut file? What carts did you use? Why do you need 4 circles, surely you only use 2 circles for every two strips? Thaks for the inspiration.
Oh my gosh - this is beautiful!! Thanks for sharing the tutorial - can't wait to try it myself!
Melissa
I love this but I'm trying to make it on the gypsy and can't figure it out. Can you please email how you weld the circles? I can't wait to make this.
Thanks,
Laurie
happydales@me.com
Darling flower!! I love the idea of doing it on your gypsy.... sometimes when I use a border punch to make these flowers I am a little more limited!! This opens up all kinds of possibilities!! Thanks!!
Barb :)
If you are sharing the .cut file, I would love it also. Thanks
How pretty!!! Will have to try this!
Your rosettes are so pretty!
These are so cute, thanks for sharing.
wow...i never thought of it..... tfs! :)
Post a Comment