


This is Pam @ The Bug Bytes. Today's my turn at designing at Sassylady. Thank you Sheila for having me as a designer at your blog. I love this idea of designing at another blog for then seeing that deadline date you create more. Too many and you will be stressed for sure but a couple of spots and yes you get inspired to create something!
Well this time instead of sharing something freshly created I wanted to share with you a small altered frame which I made as gifts during stampede to give to my table mates - so that they we could all put our stampede pictures in it. Now you can easily adapt this to give small gifts like teacher's appreciation or any event. Just change the die cuts and lol behold you will have a simple gift.
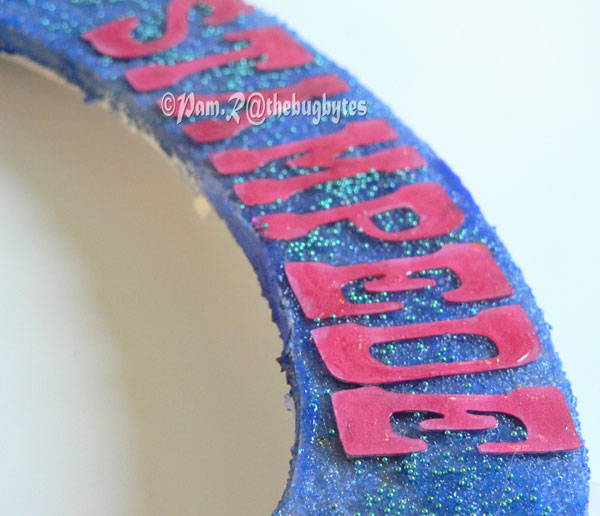
Since mine was Dallas Stampede and it was a cricut convention - this is what I came up with

Materials used
Unfinished wooden frame which has a bit of space on the outside frame part of it so that you can decorate. I got mine at Michael's for a dollar. But this had no glass. So if you want one with glass you might have to spend a bit more.
Gesso
Acrylic tube paint as heavy body is good while mixing rather than liquid ones
Liquitex Gel Glass Bead
Martha Stewart Glass beads
Sponge brush to apply Gesso
Plastic palette knife to apply the glass bead mixture
Plastic or disposable plate for mixing
Cardstock - I just cut all of mine on beige and colored with markers but you can use appropriate colors
Die cutting machine - Here I have used cricut expression and it's cartridge - Old west and also George and basic to create my own circle with antenna. But you can use any die cutting machine
For the grass - I have used flower tape
Martha Stewart fringe scissors (oh I so love this) for cutting out grass (cut at an angle and keep changing the angle for uneven grass)
Glossy accents or diamond glaze
Water in a disposable container or a plastic container
Additional embellishments
& yourself of course . A table covered with a disposable sheet or newspaper would be nice too and adequate lighting ;). The gesso and gel medium do not smell that bad but if you are too sensitive you might want to step outside while doing the project.
Warning! This might get a a bit messy so....
Ok - I'll quit horsing around and get onto the project.
This project needs to dry atleast overnight for the front to dry and then later another 30 mins atleast for the back so give adequate time. Plan for a couple of says ahead
With this supply first go and get your die cuts cut out and colored and ready. Do not apply glossy accents at this stage. You can but the die cuts tend to curl up and you will be wasting additional time.
Make a dry run of placing them on the frame and cut additional pieces or get additional things like for eg beach theme you can adhere real seas small sea shells or any other embellishments. Get them all in place and make a dry run
Then grab the supplies - plate, gesso, acrylic paints - I have used colors- yellow ochre, ultramarine or cobalt blue (not shown here) and burnt sienna, then your glass bead and MS glass beads for additional zing! and of course cover your work area and grab a container with water and a disposable plate to mix and some brush sponge and palette knife.

Then take the frame and remove the wrap if it has one ( I have not in these pictures as this is for demo only as I have already finished the project and am going to use this for other purpose). Note where the hole is as this should be at the bottom i.e land when turned. for this type of frame is supposed to stand on a table with the help of that wooden dowel. Else you can ignore this. Or if you make a mistake no problem just drill a hole later :)

Mark on the reverse side in pencil if you need it. Again I have used a sharpie for demo and not taken out the plastic wrap.

Then take a plate and add Gesso and ground color and prime the ground area with the sponge. Gesso is already thin so tube paints are preferable. You need not prime with white in the front. The gel medium is glossy and the white will show up ugly otherwise through the gaps. Clean your brush and prime the top with sky color mixed to the gesso. Keep the extra ground and sky color - do not dispose. Apply on sides and the inside frames. Leave the back alone we can later prime it after the project is done.

The gesso dries up pretty fast and need not completely dry before proceeding to next stage.
Now to the ground mixture (mix up more if you have less) add glass bead gel - lots of it as you need a thick layer. You can also add in batches as you do not need the ground color so uniform. Add paint if necessary to get the correct color. Mix up both sky and ground color. Then using palette knife apply a thick coat of ground color and sky color .Watch these videos if you need to know more about this texture mediums
http://www.youtube.com/user/LiquitexArtMaterials#p/u/5/uSU8dp6kH6w and also http://www.youtube.com/watch?v=Yu4B9rrXifg&feature=mfu_in_order&list=UL


After it dries overnight - turn it to the back. Use sandpaper to smooth it a bit and then apply white gesso to the back and you can seal it with varnish (just the back as front is already sealed with the gel medium) or gel medium (not glass).So that's it
This was my finished frame

Change the background and decor and alter your own frame. You can also play with different textures in the different acrylic mediums and also maybe add a cotton swab for clouds etc.
Hope you enjoyed this small project. Thanks for reading . If you do take the time to comment - Thank you lots more :) as I love reading your encouraging words. And Thanks Sheila for having me on at your blog.
Have a great weekend. To the Mom's out there - Happy Mother's Day.


6 comments:
This is such a FUN project to make, yet I have to tell you it is even nicer to get one as a gift as we did!!! THANK YOU PAM for this lovely gift and sharing this wonder project and tutorial with us today. It is Perfect!
Great project love it :0)thanks for the tutorial.
This is just too cute. You girls look wonderful! TFS
Sue
This is a great project. I like the detail that you put in the frame. I have wonderfully decorated frames all over my house but none that is personal like this one. Love it! TFS
I love to decorate frames and this one is just fabulous for your stampede photos. Thanks for sharing your work, PAm!
Great project and wonderful picture oa friends getting together enjoying a mutual hobby!
Post a Comment