Hello, everyone!!! And welcome to another weekly challenge at She's A Sassy Lady!!! I'm
Audrey and many thanks to Sheila for letting me the guest designer for this week's challenge. So let's get started.
Early last year, I designed this little candy card box and thought it would be wonderful to bring back as a Thanksgiving favor for your dinner guests. It would look so cute on each plate setting at your table and because they're personalized they can also act as adorable place cards!!! Here is my box design, and as my hubby is always "head of the table" I did his first, so this one is personalized with his name:
Here's what the card looks like on the inside:
And inside the card box is where you can put some little after-dinner mints or candy favors:
Isn't it cute? And isn't it such a good idea for a place card? Well, let me show you how I made it. First I cut out the cut file (which is available to you on my blog by going to my right-hand side-bar, scrolling down to the "Available Cut.Files" drop-down menu; on the menu click on "Click for List" and scroll down until you find the file name "My Candy Box Card" -- click to open and download it. My name at the top of this post is a direct link to get to my blog, just click on my name). Okay, here's what the cut.file looks like:
The picture below is what the cut template looks like and how I began folding it. On the cut file I've added tick marks where the fold lines go, however, because they are difficult to see on the picture I've drawn in arrows as a guideline for you to see where I did the first folds. I've also indicated card "front" and the card "box" ends to easily identify the ends when folding in the box:
NOTE: I scored in each fold line before folding. By scoring in the fold lines first gives me crisp, clean, and straight folds.
Once I made the folds above, I turned the card as shown on the picture below and made the following folds:
Once I'd made all the folds, I placed glue along the first section of the tab on the "box" end of the card on the front side of the card:
Next I flipped the card over to the backsde, aligned and glued down the end of the tab section, where the glue was applied, along the score line closest to it (hint: I used the eraser end of a pencil to run along the inside of the pocket along the glued section to help adhere it down):
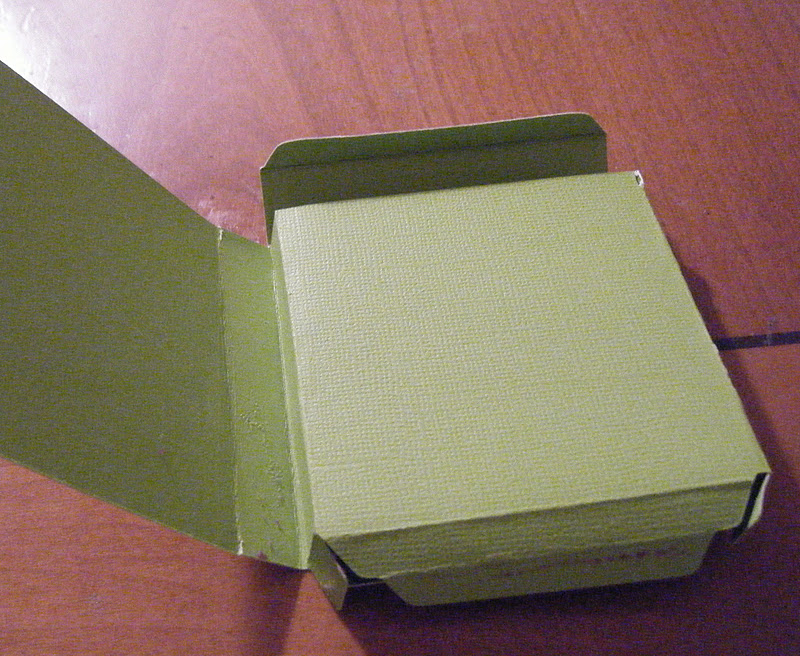
Then I folded in the small tabs on each side of the box bottom to the inside, folded up the bottom tab and glued the top bottom tab to the other tab. Now this is what the completed card box looked like:
Okay, the fun part -- decorating it!!!
I used WordPerfect to generate the wording on the inside of the card, cut it to size, and glued it in place:
The name was also typed in WordPerfect; the front of the card was a picture I found on the internet and cut to fit at 2 -3/4" x 2-3/4" (you can use any editing program to size the image):
Last, before gluing the image to the front of the card, I attached a strip of ribbon to the back of the card pocket long enough to bring the ends to the opening side of the card to tie in a bow (about 14"):
I added a few rhinestones embellies, a flower, a little 3-D lacquer to highlight a couple pieces of fruit on the card front to finish it off-- ALL DONE!!! Alright...., how will you decorate yours?!!!
As I mentioned earlier, the cut file can be found on the sidebar on my blog as instructed above. I did the file using the George cart, however, if you do not have George, please leave a comment on my blog with your email address requesting a PDF copy of the template/directions and I'll email it to you. Again, just click on my name above for a direct link to my place!
Now for the challenge!!! Please enter any project you choose to make; however, your project must include a bright green color (i.e. lime, light green, chartreuse, etc.) and brown, and at least one (1) rhinestone embellishment -- such as those on my project. Have fun!!!
Sheila, will be here next to provide further details!
Sheila Here.... This is so exciting and everyone can join with this wonderful challenge...... Remember your project must be bright green and brown and include at least 1 rhinestone..... Audrey I guess I better get to work because I would like to play along too! Now for all of those that do play along I will be giving away a wonderful stamp set. So link up by 4PM Friday the 25th of November and the winner will be chosen by Random.org and announced Saturday morning on the 26th. Now please join me in thanking Audrey for this wonderful project and awesome tutorial. Now back to Audrey.
Thanks for joining me, hugs, and I'll be seeing you!!!


16 comments:
Audrey, you never cease to amaze me with your talent. That box card is adorable. Great tutorial.
Wow this is gorgeous. I will be gone during this challenge but will check back to see what everyone makes.
Audrey this such a great treat box and I love the color combination, as the are awesome together. Your tutorial is wonderful showing us how to turn a card into a box... or is it a box into a card! LOL either way it is gorgeous! I sure hope we have a lot of ladies that participate in this great challenge! Thanks for sharing with us today.
Thanks Audrey for a lovely project! Also, thank you for the challenge! Cannot wait to see what everyone comes up with!
This is so cute. I really like those two colors together. Thanks
Jen
What a unique and creative placecard! Thank you for the challenge! I think I will go find my green and brown paper and a 'precious gem'! :0)
Carolyn
http://cccscraproom.blogspot.com
Love the card box Audrey. I don't have George but may try to switch out the cuts for a cart I have with my gypsy.
LOVE LOVE LOVE this placecard/treat box!!! This is totally you!! You are the master of boxes my friend!!
Thank you all for your wonderful remarks and for stopping by!
Thanks, too, to those of you for stopping by that didn't comment!
Now, let's all get those projects going to link up in the challenge!!! I'll be here waiting to see what you do!!!
Another gorgeous creation Audrey! Love the colors and how fun is that turkey!?
Hugs,
M
Thanks for this great project. I am going to give this a try!
Oh Audrey, this is STUNNING! I hope I can find the time to play along. Your projects are always so gorgeous!
This is a great place card/box. Love the colors. TFS
Heather
This is an awesome project!! I see so many possibilities! Thanks for the challenge!! I'm not sure if I'll get one posted but I'm gonna try! :-)
Such a sweet box/ place card. Love the colours you chose x
Love all of these projects! Many great ideas! After the craziness of this weeks festivities passes I too will be able to join in the fun...but I do so enjoy seeing everyones creative work! TFS Ladies!
Post a Comment